Introduction
Creating a stone path in your garden is a fantastic way to enhance both its beauty and functionality. Whether you want to define walkways, add texture, or create focal points, a well-designed stone path blends seamlessly with your garden’s natural elements. This guide will walk you through everything from selecting the right stone type to planning your layout, installation, and maintenance. We’ll also explore how to safely incorporate stone paths into various garden styles and discuss eco-friendly practices.
By following this step-by-step approach, you can confidently build a durable and attractive stone garden path that complements your outdoor space. Along the way, we reference expert resources like the University of Minnesota Extension, USDA Natural Resources Conservation Service, and the American Society of Landscape Architects to ensure your project aligns with best practices in landscaping and garden design.
Choosing the Right Type of Stone for Garden Paths
Selecting the appropriate stone is crucial for both aesthetics and durability. Natural stone types like flagstone, slate, limestone, and granite are popular choices due to their strength and visual appeal. Flagstone, for example, is prized for its flat, irregular shapes that create a natural, rustic look.
When choosing stone, consider:
- Texture: Avoid stones that become slippery when wet, such as polished granite.
- Color: Pick hues that complement your garden’s plants and structures.
- Climate: Some stones are better suited to freeze-thaw cycles common in temperate zones.
Using garden edging stones can also help define the path’s borders and prevent stones from shifting. Combining stone with materials like gravel can improve drainage and visual contrast.
Planning and Designing Your Stone Path Layout
A thoughtful layout will maximize your stone path’s functionality and charm. Start by measuring the area and sketching your desired route. Paths can be straight, curved, or geometric depending on your garden style.
Key planning tips include:
- Identify entry and exit points.
- Consider natural foot traffic patterns.
- Ensure the path width accommodates comfortable walking (usually 2–3 feet).
- Plan for proper drainage to avoid puddling.
Using landscape design principles recommended by the American Society of Landscape Architects, incorporate focal points like benches or garden art along the path for interest.
Tools and Materials Needed for Making a Stone Path
Gathering the right tools and materials upfront makes installation smoother. Essentials include:
- Shovel and garden hoe for ground preparation
- Tape measure and marking paint for layout
- Rubber mallet to adjust stone placement
- Level to ensure stones are even
- Gravel and coarse sand for base and bedding layers
- Landscape fabric to prevent weed growth
- Stones or pavers selected for your path
Optional but helpful: wheelbarrow, gloves, and a tamper for compacting the base.
Step-by-Step Installation Process for Stone Paths
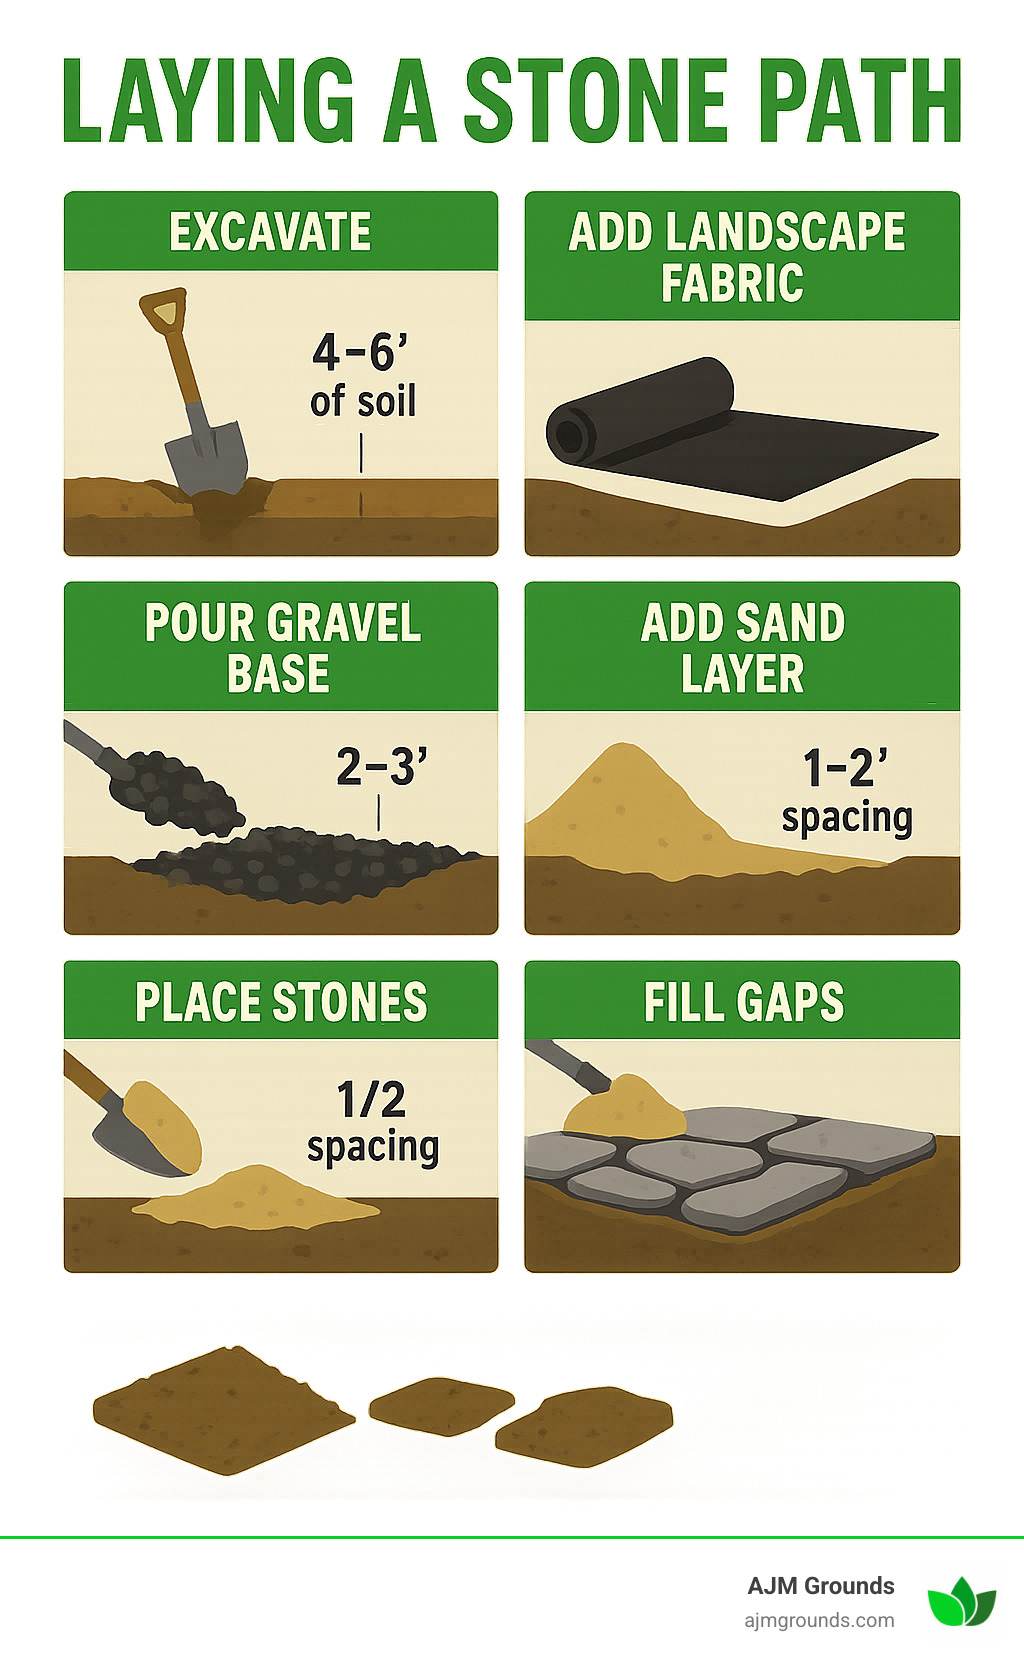
Follow these steps to build a stone path that lasts:
- Mark and Clear the Path: Outline your path with marking paint and remove grass or debris.
- Excavate the Soil: Dig down 4–6 inches to create space for base materials.
- Lay Landscape Fabric: Prevent weeds by installing a permeable fabric.
- Add Base Material: Spread 3–4 inches of crushed gravel or stone dust and compact it.
- Add Sand Bedding: Apply 1–2 inches of coarse sand to level the base.
- Place Stones: Arrange stones per your design, using a rubber mallet and level to adjust.
- Fill Gaps: Fill spaces between stones with sand, gravel, or soil mixed with moss for a natural look.
- Compact and Seal: Lightly compact the path and seal stones if necessary to protect against weathering.
Maintenance Tips for Long-Lasting Stone Paths
Stone path maintenance is essential to keep your walkway safe and attractive. Key practices include:
- Regularly removing weeds and moss that can cause uneven surfaces
- Replenishing joint sand or gravel each season
- Cleaning stones with mild detergent and water to prevent staining
- Inspecting for loose or cracked stones and resetting them promptly
- Applying sealant every few years to protect from weather damage
Following guidance from the University of Minnesota Extension ensures your stone path remains durable and visually appealing.
Incorporating Stone Paths into Different Garden Styles
Stone paths adapt beautifully to a variety of garden aesthetics:
- Cottage Gardens: Use irregular flagstones with moss-filled joints for a quaint, informal feel.
- Modern Gardens: Choose sleek, uniform pavers in geometric patterns.
- Japanese Gardens: Incorporate stepping stones with gravel beds for tranquility and balance.
- Mediterranean Gardens: Warm-toned limestone or terracotta complements drought-tolerant plants.
Consider how your stone choice and layout harmonize with existing plants, structures, and hardscape.
Safety Considerations and Environmental Impact
Safety is paramount when building a stone path. Avoid stones with smooth surfaces that become slippery when wet. Ensure stones are level and stable to prevent tripping hazards.
From an environmental perspective, using locally sourced natural stone reduces transportation emissions. Incorporate permeable materials like gravel to enhance drainage and reduce runoff. The USDA Natural Resources Conservation Service advocates for eco-friendly landscaping that conserves water and supports soil health.
How I’d Do It: Practical Tips from Experience
From my 15+ years in landscape design, I recommend:
- Spending ample time on planning and precise measuring to avoid costly mistakes.
- Choosing stones that reflect your garden’s character and climate.
- Prioritizing base preparation; a well-compacted base is key to preventing shifting.
- Using landscape fabric to keep weeds at bay.
- Sealing stones in wet climates to extend lifespan.
Test walking your path layout with temporary markers before final installation to ensure comfort and flow.
Common Pitfalls to Avoid
- Skipping soil excavation or base compaction leads to uneven surfaces.
- Selecting slippery stones can cause accidents, especially in wet weather.
- Neglecting drainage planning causes water pooling and stone damage.
- Overlooking regular maintenance invites weed growth and destabilizes the path.
- Ignoring local building codes or regulations related to garden structures.
Checklist for Making a Stone Path in Your Garden
- [ ] Measure and plan path layout carefully
- [ ] Choose appropriate stone types considering texture and climate
- [ ] Gather necessary tools and materials
- [ ] Prepare ground by excavating and laying landscape fabric
- [ ] Install gravel base and sand bedding properly
- [ ] Place and level stones accurately
- [ ] Fill joints and compact the path
- [ ] Seal stones if needed
- [ ] Schedule regular maintenance
Tools and Metrics for Success
- Tape measure for precise layout
- Marking paint to outline the path
- Shovel and hoe for excavation
- Compactor or tamper for base stability
- Level to ensure even stone placement
- Rubber mallet for stone adjustments
Metrics to track:
- Path width and length
- Depth of excavation and base layers
- Stone thickness and spacing
FAQs
What is the best stone for a garden path?
Flagstone is often considered ideal due to its natural flatness, durability, and rustic charm. However, granite and slate are also excellent choices depending on your garden’s style and climate. Avoid stones that become slippery when wet, such as polished marble.
How do I prevent weeds from growing between stones?
Installing landscape fabric beneath the base layer and filling joints with polymeric sand or gravel helps suppress weeds. Regular maintenance to remove any emerging weeds is also important to keep your path neat.
Can I install a stone path myself?
Absolutely. With proper planning, the right tools, and careful attention to the installation steps, most DIY enthusiasts can successfully build a stone path. Following expert guidance from sources like the University of Minnesota Extension can ensure your success.
How long does a stone path last?
With proper installation and maintenance, a stone path can last several decades. Regular sealing, weed control, and timely repairs are key factors in longevity.
Is it environmentally friendly to use stone paths?
Yes, especially if you source stones locally and design paths with permeable materials to enhance drainage. This reduces runoff and supports soil health, aligning with sustainable landscaping practices recommended by the USDA Natural Resources Conservation Service.
Key Takeaways
- Choosing the right stone type tailored to your garden’s style and climate is fundamental.
- Careful planning and ground preparation prevent future issues like shifting or drainage problems.
- Using landscape fabric and proper base materials ensures stability and weed control.
- Regular maintenance extends the life and beauty of your stone path.
- Incorporating eco-friendly practices benefits both your garden and the environment.
References
- University of Minnesota Extension – Building a Stone Path
- USDA Natural Resources Conservation Service – Sustainable Landscaping
- American Society of Landscape Architects – Designing Walkways
Creating a stone path is a rewarding DIY landscaping project that enhances your garden’s accessibility and charm. With this comprehensive guide, you’re equipped to make informed choices and build a path that lasts and delights for years to come.
