Efficient watering is essential for a healthy garden, and a drip irrigation system is one of the best ways to achieve this. If you’re wondering how to set up a drip system for your garden, you’re in the right place. This guide will walk you through the entire process, from understanding the benefits to installation and maintenance, ensuring your plants get the precise amount of water they need without waste.
Setting up a drip system saves water, reduces weed growth, and promotes healthier plants by delivering water directly to the roots. Whether you have a small vegetable patch or a large flower garden, drip irrigation can be customized to fit your space and plant needs. In this article, we’ll cover everything from choosing the right components to step-by-step installation tips, so you can start your garden on the path to sustainable watering.
What Is a Drip Irrigation System and Why Use It?
A drip irrigation system is a watering method that delivers water slowly and directly to the base of plants through a network of tubes, pipes, and emitters. Unlike traditional sprinklers that spray water over a wide area, drip systems target the root zone, minimizing evaporation and runoff.
Benefits of Using a Drip System in Your Garden:
- Water Efficiency: Uses up to 50% less water than sprinklers.
- Healthier Plants: Reduces fungal diseases by keeping foliage dry.
- Weed Control: Water is supplied directly to plants, limiting weed growth.
- Time-Saving: Automates watering, freeing up your time.
- Cost-Effective: Saves money on water bills and reduces plant loss.
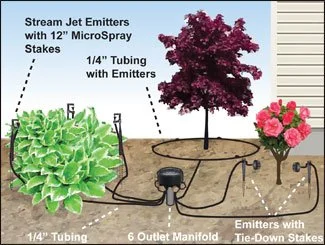
Essential Components for Setting Up a Drip System
Before installation, gather these key components to ensure a smooth setup:
| Component | Purpose |
|————————|————————————-|
| Backflow Preventer | Prevents water from flowing back into your water source. |
| Pressure Regulator | Ensures water pressure stays consistent, protecting the system. |
| Filter | Removes debris to prevent clogging of emitters. |
| Main Supply Tubing | Carries water from the source to the garden beds. |
| Drip Emitters | Control water flow to individual plants. |
| Tubing Stakes | Secure tubing in place around plants. |
| Connectors and Fittings | Join tubing sections and direct water flow. |
| End Caps | Seal off open tubing ends to prevent leaks. |
Step-by-Step Guide: How to Set Up a Drip System for Your Garden
1. Plan Your Garden Layout and Watering Needs
- Map your garden: Sketch your garden beds and plant locations.
- Determine water requirements: Group plants with similar watering needs together.
- Measure distances: Calculate tubing lengths needed to reach all plants.
2. Choose the Water Source and Attach Initial Components
- Connect your drip system to an outdoor faucet or irrigation timer.
- Attach a backflow preventer to protect your water supply.
- Install a pressure regulator to maintain a steady flow.
- Add a filter to keep impurities out of the system.
3. Lay Out the Main Supply Tubing
- Roll out the main tubing along your garden beds.
- Use tubing stakes to secure it firmly to the ground.
- Avoid sharp bends or kinks that can restrict water flow.
4. Install Drip Emitters and Branch Tubing
- Punch holes in the main tubing where plants are located.
- Insert barbed connectors and attach smaller tubing lines if needed.
- Place drip emitters near the base of each plant:
- Use emitters with appropriate flow rates (e.g., 0.5 to 2 gallons per hour) based on plant needs.
- For clustered plants, consider micro-sprayers or multi-outlet emitters.
5. Seal the System and Test It
- Cap all open tubing ends with end caps.
- Turn on the water and observe each emitter for proper flow.
- Adjust or replace emitters that are leaking or blocked.
- Check for leaks along tubing and connections.
6. Automate and Maintain Your Drip System
- Connect an irrigation timer for scheduled watering.
- Regularly inspect filters and clean them to prevent clogging.
- Flush the tubing at the start and end of each season.
- Replace damaged tubing or emitters promptly.
Tips for Optimizing Your Drip System Setup
- Use a timer: Automate watering to maintain consistent moisture levels.
- Group plants by water needs: Avoid over or underwatering.
- Mulch around plants: Retains soil moisture and reduces evaporation.
- Monitor soil moisture: Adjust watering schedules based on weather and soil conditions.
- Winterize your system: Drain and store components before freezing weather.
Common Questions About Drip Irrigation Systems
How Often Should I Water My Garden with a Drip System?
Watering frequency depends on plant type, soil, and climate. Generally, watering 2-3 times per week is sufficient for most gardens. Use a soil moisture meter to ensure roots get adequate water without overwatering.
Can I Use a Drip System for Container Gardens?
Yes! Drip irrigation is excellent for containers. Use smaller tubing and emitters tailored to pot sizes and plant needs.
What Should I Do If My Emitters Get Clogged?
Regularly check and clean emitters by soaking them in vinegar or using a small needle to clear debris. Installing a filter upstream helps reduce clogging.
Real-World Example: How a Community Garden Benefited from Drip Irrigation
A community garden in California installed a drip irrigation system and reported:
- 40% reduction in water use
- Improved plant growth and yields by 25%
- Decreased labor time spent on manual watering by 50%
This case exemplifies how drip systems can make gardens more sustainable and productive.
Conclusion
Setting up a drip system for your garden is a smart, water-efficient way to nurture your plants while saving time and resources. By following the outlined steps—planning your layout, assembling key components, installing tubing and emitters, and maintaining your system—you’ll ensure your garden thrives with minimal water waste.
Start small, experiment with different emitter types, and adjust watering schedules based on your garden’s unique needs. With a well-designed drip irrigation system, you’ll enjoy healthier plants, lower water bills, and a more sustainable gardening practice. Ready to transform your garden watering routine? Gather your materials and start setting up your drip system today!
Take action: Consider installing an automated timer on your drip system to optimize watering schedules and further enhance your garden’s health and water savings.
