Replacing garden tub faucet handles may seem like a daunting task, but with the right tools and guidance, it can be a straightforward DIY project. Whether your handles are leaking, cracked, or simply outdated, swapping them out can improve both functionality and aesthetics. In this guide, we’ll walk you through the entire process, ensuring you have the confidence and know-how to get the job done efficiently.
Garden tub faucets often experience wear and tear due to constant use and exposure to water. Faulty handles can cause leaks, reduce water pressure, or make temperature control difficult. Knowing how to replace these handles not only saves money on professional repairs but also extends the life of your tub’s plumbing fixtures. This article covers everything from selecting the right replacement handles to the step-by-step removal and installation process, along with helpful tips to avoid common mistakes.
Why Replace Garden Tub Faucet Handles?
Before diving into the how-to, it’s important to understand why replacing faucet handles matters:
- Prevent leaks and water waste: Damaged handles can cause drip leaks, increasing your water bill.
- Improve control and comfort: Worn handles might be hard to turn, affecting water temperature and flow.
- Enhance bathroom aesthetics: New handles instantly update your garden tub’s look.
- Avoid costly repairs: Early replacement prevents corrosion and damage to internal valve parts.
Tools and Materials You’ll Need
To replace your garden tub faucet handles, gather these essentials:
- Replacement faucet handles compatible with your tub model
- Phillips and flathead screwdrivers
- Allen wrench (hex key) — often needed for set screws
- Adjustable wrench or pliers
- Cleaning cloth
- Plumber’s grease (optional) for smooth handle operation
Having the right tools ensures a smooth, damage-free process.
Step-by-Step Guide to Replacing Garden Tub Faucet Handles
1. Turn Off the Water Supply
Before starting, turn off the water supply to your tub. Locate the shut-off valves, usually near the tub or in the basement, and close them to prevent water flow during the replacement.
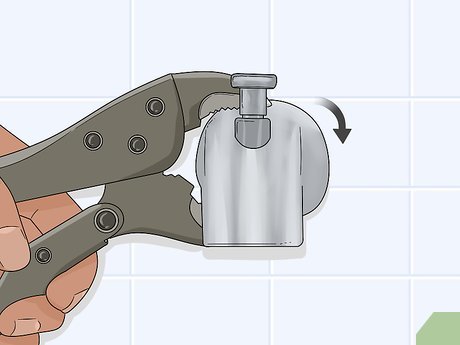
2. Remove the Old Handles
- Look for a small set screw on the handle’s base—often hidden under a decorative cap.
- Pry off the cap gently with a flathead screwdriver.
- Use the appropriate tool (usually an Allen wrench or screwdriver) to remove the set screw.
- Carefully pull the handle straight off the valve stem. If it’s stuck due to mineral buildup, gently wiggle or tap it to loosen.
3. Clean the Valve Stem and Surrounding Area
Once the old handles are removed, clean any dirt, grime, or mineral deposits from the valve stem and surrounding area using a cloth. This ensures the new handles fit properly and operate smoothly.
4. Install the New Handles
- Align the new handle’s opening with the valve stem.
- Slide the handle onto the stem firmly.
- Secure it by tightening the set screw with the Allen wrench or screwdriver.
- Replace any decorative caps if applicable.
5. Turn On the Water Supply and Test
Turn the water supply back on and test the new handles. Check for smooth operation, proper water flow, and any leaks around the base. If necessary, tighten screws or adjust alignment.
Tips to Ensure a Successful Handle Replacement
- Identify your faucet type: Garden tubs may have single or dual-handle configurations. Match your replacement handles accordingly.
- Buy quality handles: Choose durable materials like brass or stainless steel for longevity.
- Take photos: Before removal, photograph your current setup to reference during installation.
- Use plumber’s grease: Applying a small amount on the valve stem can prevent stiffness.
- Avoid over-tightening: Tighten screws just enough to secure handles without stripping threads.
Common Issues and How to Troubleshoot
| Problem | Possible Cause | Solution |
|—————————–|——————————-|———————————-|
| Handle won’t come off | Mineral buildup or corrosion | Use penetrating oil; gently tap |
| Handle is loose after installation | Set screw not tightened enough | Tighten set screw properly |
| Water leaks around handle | Damaged valve stem or washer | Inspect internal parts; replace if needed |
| Handle difficult to turn | Lack of lubrication or damage | Apply plumber’s grease; replace if necessary |
When to Call a Professional
While most garden tub faucet handle replacements are manageable for DIYers, consider professional help if:
- You encounter broken valve stems or internal damage.
- Water leaks persist after handle replacement.
- The plumbing system has complex or outdated parts.
A licensed plumber can assess and fix underlying issues to prevent further damage.
Conclusion
Replacing garden tub faucet handles is a practical way to enhance your bathroom’s function and appearance. By following the step-by-step instructions outlined above, you can confidently tackle this common household task with minimal hassle. Remember to prepare adequately, use the right tools, and choose quality replacement handles for the best results.
Taking on this project yourself not only saves money but also empowers you with basic plumbing knowledge for future maintenance. So, why wait? Refresh your garden tub today with new faucet handles and enjoy smoother operation and a refreshed look in your bathroom.
Ready to upgrade your garden tub faucet handles? Gather your tools and get started—your tub will thank you!
