Creating a raised garden bed is an excellent way to boost your gardening success, improve soil quality, and control weeds. However, before you start filling your raised bed with rich soil, you need to prepare the ground — which often means removing the grass underneath. Removing grass properly is essential to prevent it from growing back and competing with your plants.
In this guide, you’ll learn how to remove grass for a raised garden bed efficiently and effectively. We’ll cover proven techniques, tools you need, and expert tips to ensure your raised bed starts with a clean, weed-free base. Whether you’re a beginner gardener or looking to improve your gardening skills, this article will help you prepare your garden bed for a bountiful harvest.
Why Removing Grass is Crucial Before Building a Raised Garden Bed
Grass and weeds compete with your garden plants for nutrients, water, and sunlight. If left unchecked, grass roots can penetrate your raised bed and cause ongoing maintenance headaches. Removing grass at the start helps you:
- Prevent weed growth within your raised bed.
- Improve soil health by eliminating invasive roots.
- Ensure better water retention and nutrient availability.
- Reduce maintenance time over the growing season.
How to Remove Grass for Raised Garden Bed: Proven Methods
1. Manual Removal (Digging and Cutting)
Best for small to medium-sized beds or organic gardeners who want no chemical use.
Steps:
- Mark your bed area using stakes and string.
- Use a sharp spade or garden fork to cut through grass roots around the perimeter.
- Dig up the grass by cutting underneath with a spade, lifting entire sod pieces.
- Remove all grass and roots to prevent regrowth.
- Turn the soil over and rake away remaining debris.
Pros:
- Chemical-free and environmentally safe.
- Provides immediate results.
Cons:
- Labor-intensive and time-consuming.
- Can be physically demanding.
2. Solarization (Using the Sun to Kill Grass)
Ideal for gardeners with time to wait 4-6 weeks before planting.
Steps:
- Mow the grass as short as possible.
- Water the grass thoroughly to promote heat conduction.
- Cover the bed area with clear plastic sheeting (thick polyethylene).
- Seal edges with soil, rocks, or stakes to trap heat.
- Leave the plastic in place for 4-6 weeks during the hottest months.
How it works: Solarization traps solar energy, heating the soil to temperatures that kill grass roots and weed seeds.
Pros:
- Chemical-free and very effective.
- Improves soil by killing pathogens.
Cons:
- Requires waiting period.
- Less practical in cooler climates or short growing seasons.
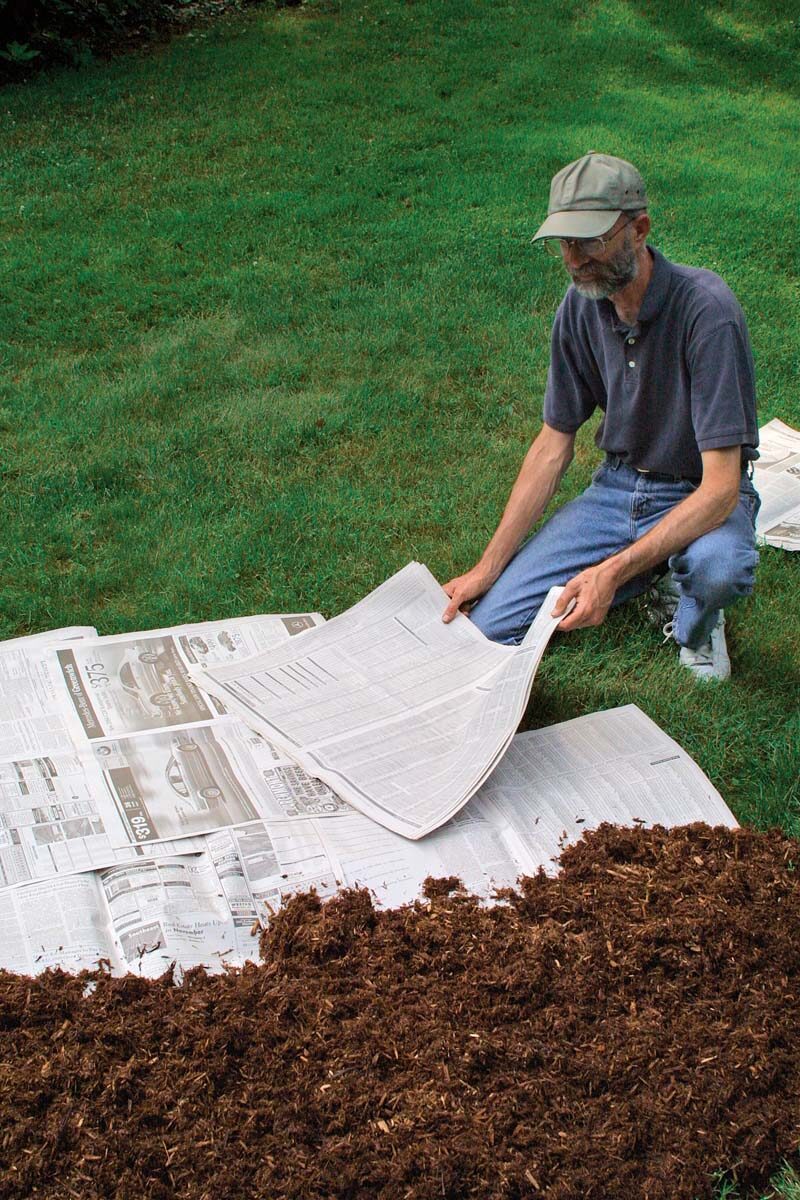
3. Sheet Mulching (Smothering Grass with Layers)
A natural and sustainable method, often used by permaculture gardeners.
Steps:
- Cut the grass as low as possible.
- Lay down cardboard or several layers of newspaper, overlapping edges to block light.
- Wet the cardboard thoroughly.
- Add a thick layer (4-6 inches) of organic mulch such as compost, straw, or wood chips on top.
- Leave for several weeks or months to smother grass and improve soil.
Pros:
- Builds soil fertility over time.
- Suppresses weeds effectively.
- Ideal for improving poor soil.
Cons:
- Takes time before planting.
- Needs sufficient organic material.
4. Herbicide Application (Chemical Method)
Use only as a last resort or if you are not sensitive to chemicals. Always follow local regulations and safety instructions.
Steps:
- Select a glyphosate-based herbicide or a grass-specific weed killer.
- Spray on the grass according to product instructions.
- Wait 7-14 days for the grass to die completely.
- Remove dead grass and prepare the bed.
Pros:
- Fast and effective.
- Requires less physical effort.
Cons:
- Potential environmental and health risks.
- May affect nearby plants if not applied carefully.
Tools You’ll Need to Remove Grass for Raised Beds
- Sharp garden spade or shovel
- Garden fork or digging fork
- String and stakes for marking
- Clear plastic sheeting (for solarization)
- Cardboard or newspaper (for sheet mulching)
- Organic mulch (straw, compost, wood chips)
- Gloves and knee pads for comfort
- Optional: Herbicide and sprayer
Tips to Prevent Grass Regrowth in Your Raised Garden Bed
- Install a Weed Barrier: Lay landscape fabric or heavy-duty cardboard under the raised bed before adding soil.
- Use Deep Raised Beds: Fill beds with at least 12-18 inches of quality soil to discourage grass roots from reaching up.
- Maintain Mulch Layer: Mulching regularly can suppress any emerging weeds.
- Regular Inspection: Check your raised bed for any grass shoots and remove them promptly.
- Practice Crop Rotation: Helps maintain soil health and reduce weeds.
Expert Insight: Preparing for Long-Term Success
Renowned horticulturist Dr. Lisa Johnson advises, “Taking the time to remove grass thoroughly before building your raised garden bed pays dividends. It reduces weed pressure and allows your plants to thrive without competition. Combining solarization with organic mulching is a sustainable approach that also enhances soil biology.”
Conclusion
Removing grass for a raised garden bed is a critical step that sets the foundation for a flourishing garden. Whether you choose manual digging, solarization, sheet mulching, or herbicides, the key is to eliminate grass roots completely to prevent regrowth. Each method has its benefits and drawbacks, so select the one that fits your timeline, gardening philosophy, and resources.
Remember, preparing your raised bed properly not only saves time and effort later but also creates an ideal environment for your plants to thrive. Start today, and watch your garden flourish with healthier, weed-free soil!
Ready to build your raised garden bed? Begin by removing grass using these expert-backed methods and enjoy a productive gardening season!
