Composting is an eco-friendly way to reduce household waste and enrich your garden soil. If you want to take your composting efforts a step further, making a wormery for garden compost is an excellent option. Wormeries use worms to break down organic waste quickly and efficiently, producing nutrient-rich worm castings that boost plant growth. This guide will walk you through how to make a wormery for garden compost, covering everything from selecting materials to maintaining your worm farm.
Whether you’re a gardening enthusiast or a beginner eager to reduce waste, this article provides detailed instructions, expert tips, and answers to common questions about wormeries. Let’s dive in and learn how to turn your organic scraps into black gold for your garden!
What is a Wormery and Why Use One?
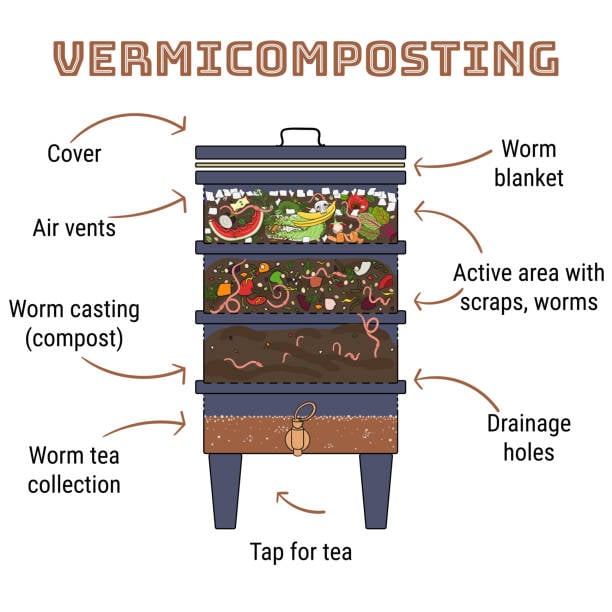
A wormery, also called a vermicompost bin, is a container designed to house composting worms—usually red wigglers—that digest kitchen scraps and garden waste. Unlike traditional composting, wormeries break down organic material faster and produce worm castings, a highly valuable fertilizer rich in nutrients and beneficial microbes.
Key Benefits of Using a Wormery:
- Faster composting process compared to traditional methods.
- Space-efficient for small gardens or balconies.
- Produces nutrient-dense worm castings that improve soil structure and plant health.
- Reduces household waste, lowering your carbon footprint.
- Minimal odor and pest issues when properly maintained.
Materials Needed to Make a Wormery
Before you start building, gather these essential materials:
- Container: A plastic or wooden box with a lid (approx. 12-18 inches deep). Examples include a plastic storage bin, wooden crate, or repurposed drawer.
- Drill or sharp tool: For making ventilation and drainage holes.
- Bedding material: Shredded newspaper, cardboard, coconut coir, or dried leaves.
- Water spray bottle: To keep the bedding moist.
- Worms: Red wigglers (Eisenia fetida) are the preferred species for composting.
- Kitchen scraps: Fruit and vegetable peelings, coffee grounds, crushed eggshells (avoid meat, dairy, oily foods).
How to Make a Wormery for Garden Compost: Step-by-Step Instructions
Step 1: Choose and Prepare Your Container
- Select a container with a lid to keep the environment dark and humid.
- Drill small holes in the sides and bottom for ventilation and drainage (about 5-10 mm diameter).
- Place a tray or plate beneath the container to collect any excess liquid, known as worm tea, which can be used as a liquid fertilizer.
Step 2: Prepare the Bedding
- Moisten shredded newspaper or cardboard until damp but not soaking wet.
- Fill the container about two-thirds full with the bedding material.
- Fluff the bedding to create air pockets that allow worms to breathe.
Step 3: Add Worms and Food Waste
- Gently introduce your red wigglers to the bedding.
- Bury a small amount of food scraps in one corner of the wormery.
- Avoid adding too much food at once to prevent odors and pests.
Step 4: Maintain Your Wormery
- Keep the wormery in a shaded, cool place (ideally 15-25°C or 59-77°F).
- Maintain bedding moisture by spraying with water when it starts to dry.
- Add food scraps regularly, but in moderation.
- Stir the contents gently every few weeks to aerate.
Step 5: Harvest the Compost
- After 2-3 months, you’ll notice dark, crumbly worm castings.
- Move the contents to one side of the container and add fresh bedding and food to the empty side.
- The worms will migrate, making it easier to collect the finished compost.
Tips for Success: Common Wormery FAQs
What Worms Are Best for Composting?
Red wigglers (Eisenia fetida) are the most efficient composting worms. They thrive in confined spaces and consume organic waste quickly.
Can I Compost Meat or Dairy in a Wormery?
No. Meat, dairy, oily, and processed foods attract pests and produce foul odors. Stick to fruit and vegetable scraps, coffee grounds, and crushed eggshells.
How Often Should I Feed the Worms?
Feed your worms about once a week, adjusting quantity based on how much they consume. Remove uneaten food after two weeks to prevent mold.
How Do I Prevent Odors?
Maintain proper moisture, avoid overfeeding, and ensure adequate ventilation. A healthy wormery should have an earthy smell, not foul odors.
Expert Insights: Why Vermicomposting Enhances Soil Health
According to soil scientists, worm castings contain beneficial microbes that improve nutrient availability, promote root growth, and increase soil aeration. A study published in the Journal of Environmental Quality found that vermicompost-treated soil had higher levels of nitrogen, phosphorus, and potassium compared to regular compost.
Using a wormery not only recycles waste but also produces a superior fertilizer, helping gardeners grow healthier, more resilient plants.
Troubleshooting Common Wormery Issues
| Problem | Cause | Solution |
|———————-|——————————–|————————————–|
| Worms escaping | Too wet, too dry, or too hot | Adjust moisture, temperature; add bedding |
| Foul smell | Overfeeding or poor ventilation | Feed less, increase airflow |
| Fruit flies | Exposed food scraps | Bury scraps deeper, cover with bedding |
| Bedding drying out | Low humidity | Spray with water regularly |
Conclusion
Making a wormery for garden compost is a practical, sustainable way to manage organic waste and improve your garden’s soil fertility. By following the simple steps of selecting the right container, preparing bedding, adding worms, and maintaining the system, you’ll create a thriving worm farm that produces rich, natural fertilizer.
Start your vermicomposting journey today to reduce waste, save money on fertilizers, and grow healthier plants. Remember, a successful wormery requires patience and care but rewards you with continuous benefits for your garden and the environment.
Ready to build your own wormery? Gather your materials, invite some red wigglers, and watch your garden thrive with nutrient-rich compost!
