Creating a rain garden is an excellent way to manage stormwater runoff, reduce erosion, and support local ecosystems. But how exactly do you make a rain garden step by step? This guide will walk you through the entire process—from planning and site selection to planting and maintenance. Whether you’re a homeowner looking to enhance your yard’s sustainability or a gardening enthusiast eager to try something new, understanding how to build a rain garden can help you create a beautiful, functional landscape feature that benefits both you and the environment.
Rain gardens are shallow, planted depressions designed to capture rainwater runoff from roofs, driveways, and other hard surfaces. By infiltrating water on-site, they reduce the burden on stormwater systems and filter pollutants before they reach local waterways. This article covers everything you need to know to build your own rain garden, including soil preparation, plant selection, and ongoing care. Let’s dive into the step-by-step process to help you create a thriving rain garden that suits your property’s needs.
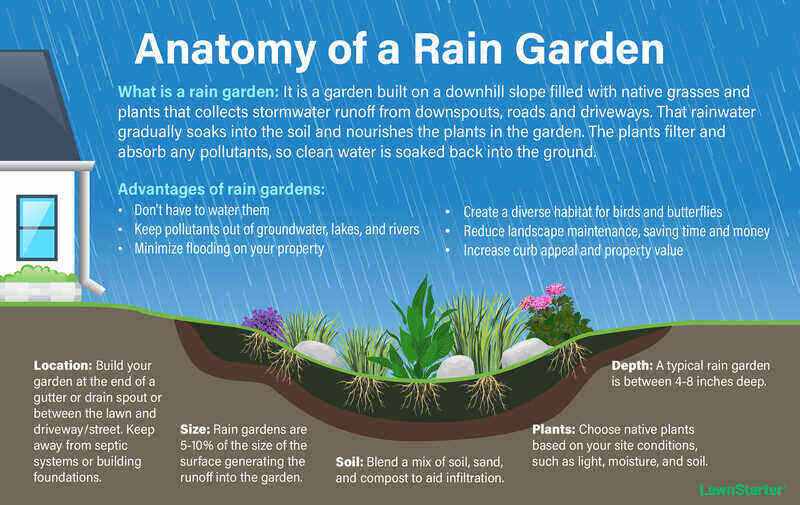
What Is a Rain Garden and Why Should You Build One?
A rain garden is a strategically placed garden designed to collect and absorb rainwater runoff. Instead of allowing water to flow directly into storm drains or local streams—which can cause flooding and pollution—a rain garden captures this water and lets it soak into the ground naturally.
Benefits of Rain Gardens:
– Reduces stormwater runoff and prevents flooding.
– Filters pollutants such as oil, fertilizers, and sediment before they enter waterways.
– Enhances local biodiversity by providing habitat for pollinators and wildlife.
– Improves groundwater recharge, helping maintain water supply.
– Adds aesthetic value to your landscape with colorful native plants.
Step 1: Choose the Right Location for Your Rain Garden
Selecting the ideal spot is crucial for your rain garden’s success. Consider these factors:
- Proximity to runoff sources: Place the garden where it can collect water from downspouts, driveways, or patios.
- Distance from structures: Keep at least 10 feet away from your home’s foundation to avoid water damage.
- Slope and drainage: Choose a gently sloping area (ideally 2-6%) to allow water to flow in but avoid areas where water pools excessively.
- Sun exposure: Most rain garden plants prefer full sun to part shade, so evaluate the sunlight your site receives.
- Soil type: Well-draining soil is best. Avoid compacted or heavy clay soils unless you plan to amend them.
Step 2: Measure and Mark Your Rain Garden Area
Once you’ve chosen the location, size your rain garden based on the drainage area and soil type. A typical rain garden is 100-300 square feet, but this varies. Follow these guidelines:
- Calculate drainage area: Measure the square footage of the surfaces that will drain into the garden.
- Determine garden size: The rain garden should be about 20-30% of the drainage area in clay soils and 10-20% in sandy soils.
- Mark boundaries: Use stakes and string or spray paint to outline the shape. Circular or kidney-shaped gardens are common and visually appealing.
Step 3: Test Your Soil’s Drainage
Good infiltration is key to a functioning rain garden. Conduct a simple percolation test:
- Dig a hole about 6-12 inches deep in your marked area.
- Fill it with water and let it drain completely.
- Refill the hole and measure how long it takes to drain.
Ideal drainage rate: Water should drain within 24 hours. If drainage is slower, amend the soil with compost or sand to improve permeability.
Step 4: Excavate and Shape the Rain Garden
Excavate the area to create a shallow basin 4-8 inches deep. Consider these points:
- Create a gentle slope: The garden should have a flat bottom with gently sloping sides to hold water temporarily.
- Build a berm: Use the excavated soil to form a berm on the downhill side to prevent water from flowing out too quickly.
- Line overflow paths: Designate overflow areas for excess water during heavy rain to avoid erosion.
Step 5: Amend the Soil
Enhance your soil’s water retention and nutrient content by mixing in organic matter such as compost. This helps support healthy plant growth and improves infiltration.
- Mix approximately 25-50% compost into the top 6-12 inches of soil.
- Avoid using heavy clay without amendments, as poor drainage can harm plants.
Step 6: Select Native Plants for Your Rain Garden
Choosing the right plants is vital. Native plants are preferred because they are adapted to local conditions, support pollinators, and require less maintenance.
Plant selection tips:
– Include a mix of grasses, sedges, wildflowers, and shrubs.
– Select plants that tolerate both wet and dry conditions since the garden will cycle between soaking and drying.
– Use plants with deep root systems to improve soil structure and infiltration.
Recommended plants for rain gardens:
| Plant Type | Example Species | Characteristics |
|—————–|—————————–|—————————————|
| Grasses | Switchgrass (Panicum virgatum) | Tall, drought tolerant |
| Sedges | Pennsylvania Sedge (Carex pensylvanica) | Shade tolerant, stabilizes soil |
| Wildflowers | Black-eyed Susan (Rudbeckia hirta) | Attracts pollinators, vibrant blooms |
| Shrubs | Red Twig Dogwood (Cornus sericea) | Moisture tolerant, adds structure |
Step 7: Plant Your Rain Garden
Follow these planting guidelines:
- Arrange plants according to height, placing taller species in the center or back and shorter ones near edges.
- Space plants to allow for mature growth—crowded plants can inhibit infiltration.
- Water plants thoroughly after planting to help establish roots.
Step 8: Mulch and Water
Apply a 2-3 inch layer of mulch (preferably shredded hardwood or pine bark) to suppress weeds, retain moisture, and prevent soil erosion.
- Avoid excessive mulch that can block water infiltration.
- Water regularly during the first growing season to help plants establish.
Step 9: Maintain Your Rain Garden
Proper maintenance ensures long-term success:
- Weed regularly to prevent invasive species from taking over.
- Replenish mulch annually to maintain coverage.
- Inspect after storms for erosion or sediment buildup and repair as needed.
- Prune dead plant material in late winter or early spring.
- Consider additional plantings if some species don’t thrive.
Real-World Success Example
In Minneapolis, Minnesota, a community rain garden program helped reduce localized flooding by 30%. Residents installed rain gardens using native plants, significantly improving water quality and creating urban wildlife habitats. This example shows how individual efforts can have a measurable environmental impact.
Frequently Asked Questions About Rain Gardens
Q1: How deep should a rain garden be?
A: Typically, 4 to 8 inches deep to capture and slowly infiltrate runoff without standing water for long periods.
Q2: Can I build a rain garden on clay soil?
A: Yes, but you will need to amend the soil with compost or sand to improve drainage.
Q3: How much does it cost to build a rain garden?
A: Costs vary widely based on size and materials but generally range from $3 to $10 per square foot if DIY.
Q4: Do rain gardens attract mosquitoes?
A: Properly designed rain gardens drain within 24-48 hours, which discourages mosquito breeding.
Conclusion: Start Building Your Rain Garden Today
Building a rain garden is a rewarding project that combines environmental stewardship with landscape beauty. By following these steps—choosing the right location, preparing the soil, selecting native plants, and maintaining your garden—you can create a sustainable feature that manages stormwater, supports wildlife, and enhances your property’s value.
Take the first step today: assess your yard for runoff areas and imagine how a rain garden could transform your outdoor space. With patience and care, you’ll enjoy a vibrant garden that makes a positive impact for years to come.
Ready to build your rain garden? Start small, plan carefully, and watch your garden flourish while helping the environment—one raindrop at a time.
