Gardening enthusiasts know that efficient watering is crucial for healthy plants. A drip irrigation system delivers water directly to the roots, minimizing waste and promoting optimal growth. If you’re looking to conserve water, save time, and boost your garden’s productivity, learning how to make a drip system for your garden is a smart investment. This guide will walk you through the process, from gathering materials to installation and maintenance, ensuring your garden thrives all season long.
In this comprehensive article, you’ll discover why drip irrigation is superior to traditional watering methods, how to design a system tailored to your garden’s needs, and practical tips to maximize its effectiveness. Whether you have a small backyard or an expansive vegetable patch, this step-by-step approach will empower you to build a reliable, cost-effective drip system that conserves water and nurtures your plants.
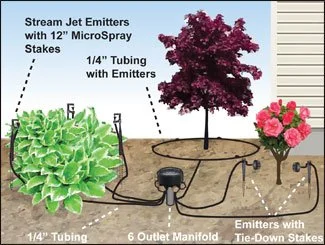
What Is a Drip Irrigation System and Why Use It?
Drip irrigation is a watering method that delivers water slowly and directly to plant roots through a network of tubes and emitters. Unlike sprinklers or hand-watering, drip systems reduce evaporation, runoff, and weed growth by targeting specific areas.
Benefits of Drip Irrigation:
- Water Conservation: Uses up to 50% less water than conventional methods.
- Improved Plant Health: Consistent moisture encourages stronger root systems.
- Weed Reduction: Limits water to crop roots, reducing unwanted weed growth.
- Time-Saving: Automate watering with timers, freeing your schedule.
- Flexibility: Easily adapts to any garden layout, from flower beds to vegetable plots.
According to the EPA, drip irrigation can reduce water usage by nearly 30-60%, making it an environmentally friendly choice for sustainable gardening.
Materials Needed to Build a Drip System
Before you start, gather these essential supplies:
| Material | Purpose |
|—————————|——————————————|
| Mainline Tubing (1/2-inch) | Carries water from the source to plants |
| Drip Emitters (1-4 GPH) | Controls water flow to each plant |
| Micro Tubing (1/4-inch) | Connects emitters to mainline |
| Pressure Regulator | Ensures consistent water pressure |
| Backflow Preventer | Prevents contamination of water supply |
| Filter | Removes debris to protect emitters |
| Fittings and Connectors | Joins tubing pieces securely |
| Timer (optional) | Automates watering schedule |
| Garden Stakes | Secures tubing in place |
Most materials are available at garden centers or online irrigation suppliers. Investing in quality components ensures durability and efficient water delivery.
Step-by-Step Guide: How to Make a Drip System for Your Garden
Step 1: Plan Your Drip Irrigation Layout
- Measure Your Garden Area: Sketch your garden and mark plant locations.
- Determine Water Needs: Group plants with similar watering requirements.
- Design Mainline and Branches: Plan tube runs to cover all plants efficiently.
- Calculate Flow Rate: Sum emitter flow rates to ensure your water source can handle the load.
Step 2: Gather and Prepare Materials
- Cut the mainline tubing to fit your layout.
- Attach the backflow preventer, filter, and pressure regulator to the water source.
- Connect the mainline tubing to these components.
Step 3: Install the Mainline Tubing
- Lay out the mainline along your garden beds.
- Secure tubing with garden stakes every 2-3 feet to prevent movement.
- Avoid sharp bends or kinks to maintain water flow.
Step 4: Add Micro Tubing and Emitters
- Use a hole punch tool to create holes in the mainline where emitters will be installed.
- Insert barbed connectors into the holes.
- Attach micro tubing to connectors and place emitters near plant bases.
- Choose emitter rates based on each plant’s water needs (e.g., 1 GPH for drought-tolerant plants, 4 GPH for thirsty vegetables).
Step 5: Test the System
- Turn on the water and check each emitter for proper flow.
- Look for leaks or blockages and fix them immediately.
- Adjust or add emitters as needed to ensure uniform watering.
Step 6: Automate and Maintain
- Install a timer to schedule watering times, preferably early morning or late evening.
- Regularly check filters and clean emitters to prevent clogging.
- Winterize your system in cold climates by draining tubing.
Tips for Optimizing Your Garden Drip System
- Use Mulch: Cover soil around emitters with mulch to retain moisture and reduce evaporation.
- Zone Your Garden: Separate plants into zones with different watering schedules based on water needs.
- Monitor Soil Moisture: Use a moisture meter to adjust watering frequency and avoid overwatering.
- Upgrade with Sensors: Integrate rain or soil moisture sensors for smart irrigation that adjusts automatically.
- Plan for Expansion: Leave extra tubing and connectors for future garden growth.
Common Questions About Garden Drip Systems
How much does it cost to install a drip irrigation system?
Basic DIY drip systems can cost between $50 to $150, depending on garden size and equipment quality. Automated timers and sensors add to the cost but increase convenience and efficiency.
Can I use drip irrigation for all plants?
Most plants benefit from drip irrigation, especially vegetables, shrubs, and flowers. However, some large trees may require deep watering techniques, not suited for typical drip emitters.
How do I prevent clogging in my drip system?
Install a quality filter at the water source and regularly flush the system. Consider using pressure-compensating emitters for consistent flow even if some clogging occurs.
Real-World Example: Drip System Success Story
A community garden in California reduced its water consumption by 40% after switching to a drip irrigation system. Gardeners reported healthier plants and higher yields, especially in tomato and pepper patches. Automation saved volunteers several hours weekly, allowing more focus on planting and harvesting.
Conclusion
Creating a drip irrigation system for your garden is an excellent way to save water, promote healthy plant growth, and simplify your gardening routine. By carefully planning, assembling quality components, and maintaining the system properly, you ensure efficient water delivery tailored to your plants’ needs. Whether you are a novice or experienced gardener, implementing drip irrigation can transform your garden’s productivity and sustainability.
Ready to take your garden to the next level? Start planning your drip system today and enjoy a flourishing garden with less effort and environmental impact. Remember, smart watering is the key to thriving plants and a greener future.
Start your drip irrigation project now, and watch your garden flourish with every drop!
