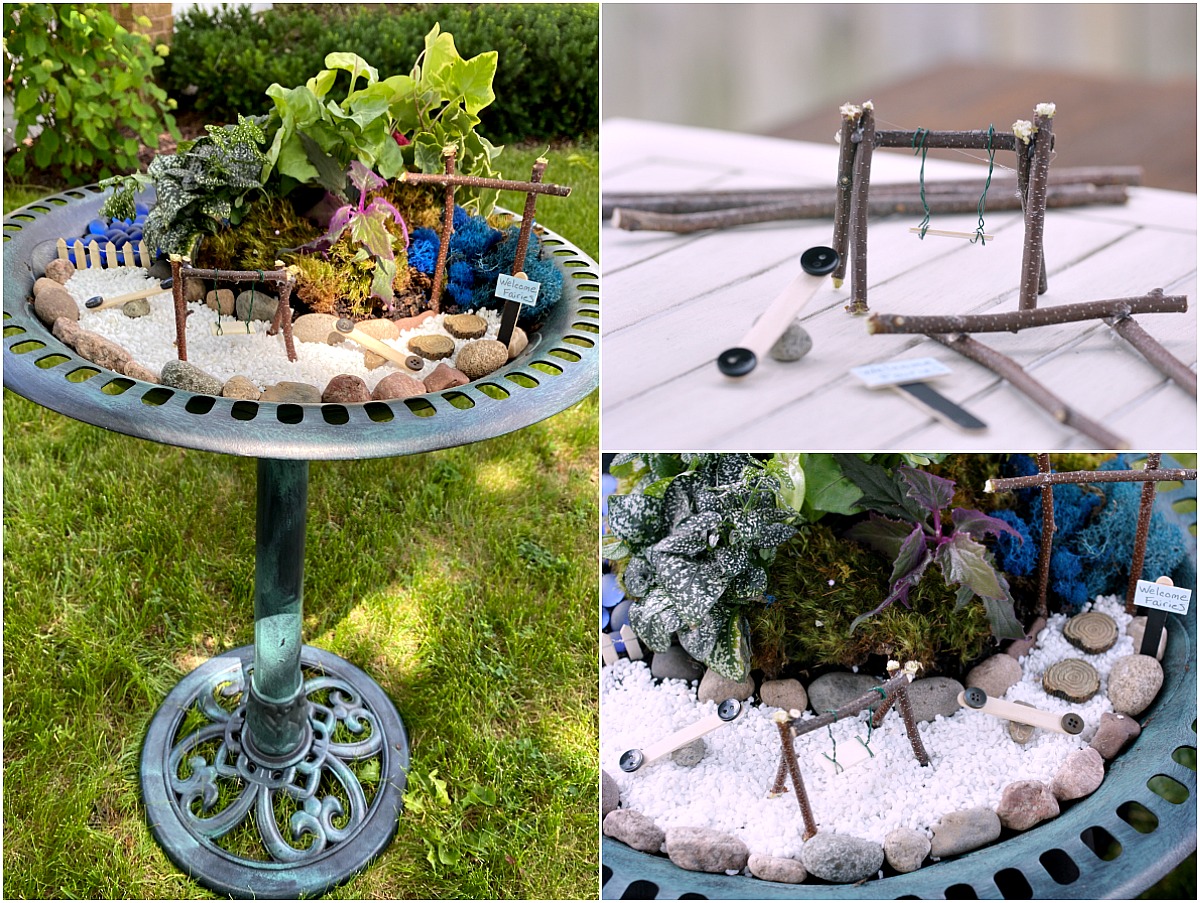
Creating a bird bath fairy garden combines the charm of a miniature fairy garden with the allure of a bird-friendly water feature. This enchanting outdoor project not only attracts birds but also adds a whimsical touch to your garden or patio. Whether you’re an experienced gardener or a beginner, this guide will walk you through how to make a bird bath fairy garden that’s both beautiful and functional.
In this article, you’ll learn why bird bath fairy gardens are popular, how to select the right materials, and step-by-step instructions for building your own. We’ll also cover maintenance tips to keep your garden fresh and inviting for both birds and fairies alike.
Why Create a Bird Bath Fairy Garden?
Bird bath fairy gardens serve a dual purpose: they provide a safe water source for birds and create a magical miniature landscape that delights the eye. Here’s why they’re a great addition to any outdoor space:
- Attracts wildlife: Birds need water for drinking and bathing, especially during hot weather.
- Decorative appeal: Combining fairy garden elements with a bird bath adds charm and whimsy.
- Educational: Great for kids and adults to learn about birds and gardening.
- Relaxation: Watching birds bathe in your fairy garden is a calming, joyful experience.
Materials Needed to Make a Bird Bath Fairy Garden
Before starting, gather the following materials to ensure a smooth project:
- Bird bath base: Choose an existing bird bath or a shallow water container.
- Fairy garden accessories: Miniature houses, figurines, furniture, bridges, and pathways.
- Plants: Small, low-maintenance plants like moss, succulents, or miniature ferns.
- Decorative stones and gravel: For pathways and drainage.
- Waterproof sealant: To protect certain materials from water damage.
- Gardening tools: Small trowel, scissors, and a watering can.
- Soil or potting mix: For planting miniature greenery.
- Optional lighting: Solar-powered fairy lights or LED spots to illuminate the garden at night.
Step-by-Step Guide: How to Make a Bird Bath Fairy Garden
Step 1: Choose the Perfect Location
Select a spot that offers partial sunlight and is accessible for bird visitors. Ideally, place the bird bath on a stable surface away from predators like cats. Near flowering plants or shrubs is a great choice to attract more birds.
Step 2: Prepare the Bird Bath Base
- Clean your bird bath or container thoroughly to remove dirt and algae.
- If using a shallow container, drill small drainage holes to prevent water stagnation.
- Apply waterproof sealant around the edges if needed to prolong durability.
Step 3: Add Soil and Plants
- Fill the edges of the bird bath with potting mix, leaving the center for water.
- Plant miniature greenery like moss, succulents, or small ferns around the rim.
- Arrange plants to create a natural, inviting environment for birds and fairies.
Step 4: Design the Fairy Garden
- Place miniature fairy houses, benches, bridges, and figurines thoughtfully around the bird bath.
- Use decorative stones or gravel to create pathways and define garden areas.
- Incorporate small natural elements like twigs, pinecones, or shells for added texture.
Step 5: Fill with Fresh Water
- Fill the center of the bird bath with clean, fresh water.
- Change the water every 2-3 days to keep it clean and safe for birds.
- In hot weather, check water levels daily to ensure birds have enough to drink and bathe.
Step 6: Add Lighting (Optional)
- Enhance the fairy garden’s magic by installing solar-powered fairy lights around the garden.
- Position lights to highlight key features like fairy houses and plants.
Tips for Maintaining Your Bird Bath Fairy Garden
- Regular cleaning: Remove debris and algae weekly to keep water fresh.
- Plant care: Trim plants as needed and replace any that die.
- Seasonal adjustments: In colder climates, empty and store the bird bath during winter to prevent cracking.
- Observe and adapt: Watch how birds interact with your garden and make changes accordingly.
Benefits of a Bird Bath Fairy Garden
| Benefit | Explanation |
|—————————–|—————————————————–|
| Supports local wildlife | Provides water and habitat for birds and insects. |
| Enhances garden beauty | Adds a whimsical, decorative element to outdoor spaces. |
| Promotes relaxation | Invites peaceful moments while watching nature. |
| Encourages creativity | Offers a fun, artistic gardening project. |
Frequently Asked Questions (FAQs)
What plants work best in a bird bath fairy garden?
Choose drought-tolerant, miniature plants like moss, succulents, or small ferns. These plants thrive in shallow soil and require minimal maintenance.
How often should I change the water?
For bird safety, refresh the water every 2-3 days, or daily in hot weather to prevent mosquito breeding and keep the water clean.
Can I use a regular bird bath for this project?
Yes! A standard bird bath works well as a base. Just add fairy garden elements around the edges and ensure there’s enough space for water and plants.
Conclusion
Making a bird bath fairy garden is a delightful way to blend nature, creativity, and garden functionality. By combining a water source for birds with whimsical miniature decorations and plants, you create a magical space that invites wildlife and sparks joy. Remember to maintain your garden regularly and enjoy the calming presence of birds and fairies in your outdoor sanctuary. Ready to start your project? Gather your materials and let your imagination take flight!
Creating a bird bath fairy garden is not just about aesthetics; it’s about fostering a little ecosystem full of life and wonder right in your backyard. Take the first step today and watch as your garden transforms into a lively haven for birds and a charming retreat for your imagination.
