Installing a soaker hose in a raised garden bed is an efficient way to keep your plants well-watered while conserving water and reducing manual effort. Soaker hoses deliver water directly to the soil, ensuring deep root hydration without wasting water through evaporation or runoff. Whether you’re an experienced gardener or a beginner, learning how to install a soaker hose correctly will improve plant health and simplify garden maintenance.
In this article, we will walk you through the entire process of installing a soaker hose in a raised garden bed. From selecting the right hose to positioning, connecting, and maintaining it, you’ll gain expert tips and proven techniques to maximize your garden’s potential. By the end, you’ll have a reliable, water-efficient irrigation system tailored to your raised bed’s specific needs.
Why Use a Soaker Hose in a Raised Garden Bed?
Before diving into installation, it’s important to understand why soaker hoses are ideal for raised beds:
- Water Efficiency: Soaker hoses release water slowly and directly into the soil, reducing water waste.
- Deep Root Hydration: The slow seepage encourages roots to grow deeper, improving plant resilience.
- Reduced Foliage Wetness: Watering at soil level minimizes leaf diseases caused by wet foliage.
- Ease of Use: Once installed, soaker hoses automate watering, saving time and effort.
With these benefits in mind, let’s explore how to install your soaker hose properly.
Preparing for Installation
Materials You’ll Need
- Soaker hose (length depends on your raised bed size)
- Hose timer (optional but recommended)
- Garden hose or outdoor faucet connection
- Hose connectors and end caps
- Scissors or utility knife
- Mulch (optional)
Choosing the Right Soaker Hose
Consider these factors to select the best soaker hose for your raised garden bed:
- Length and Diameter: Measure your garden bed perimeter. A ½ inch diameter hose is standard and balances flow and coverage.
- Material: Look for UV-resistant, durable rubber hoses for longevity.
- Flow Rate: Some hoses have adjustable flow; choose based on your plant water needs.
- Perforation Pattern: Uniform holes ensure even water distribution.
Step-by-Step Installation Guide
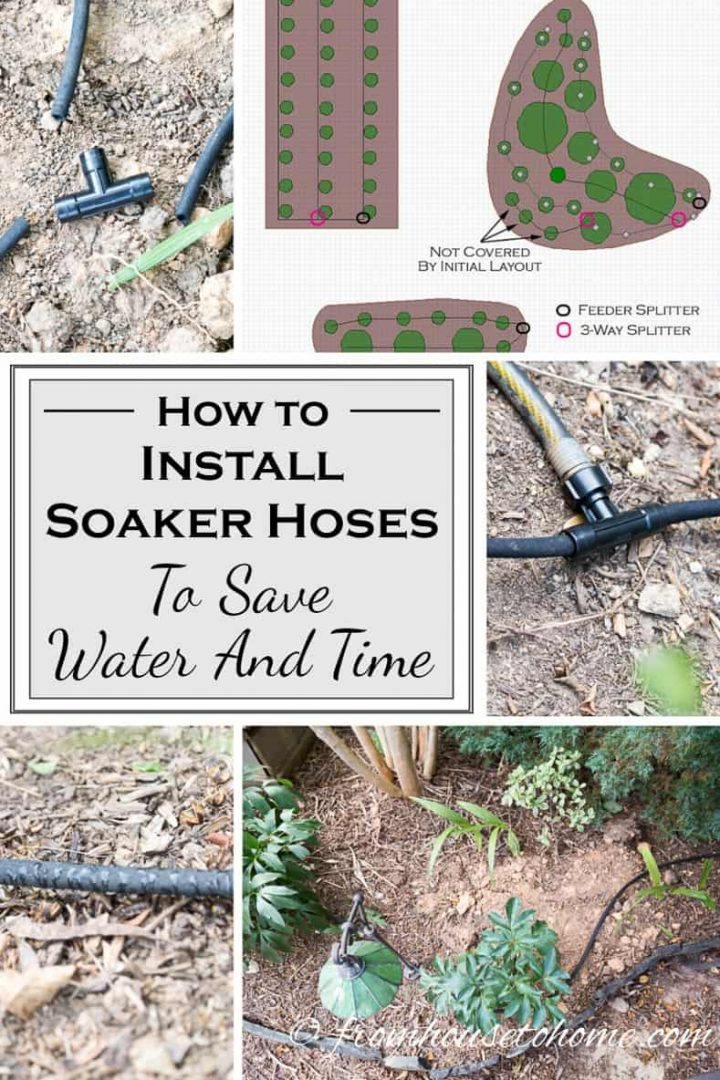
Step 1: Plan Your Hose Layout
- Sketch your raised bed and plan the hose path to cover all plants evenly.
- For rectangular beds, lay the hose in parallel rows spaced 6-12 inches apart, depending on plant spacing.
- Avoid sharp bends to prevent kinking.
Step 2: Prepare the Bed Surface
- Remove debris and level the soil surface.
- Moisten the soil lightly to help the hose settle in.
Step 3: Lay the Soaker Hose
- Unroll the soaker hose along the planned path.
- Position the hose flat on the soil surface. You may anchor it with landscape staples or small stakes every few feet.
Step 4: Connect the Hose to Water Source
- Attach a garden hose or timer to your outdoor faucet.
- Connect the soaker hose using appropriate hose connectors.
- Cap the end of the soaker hose with an end cap to maintain pressure.
Step 5: Test the System
- Turn on the water slowly and check for even seepage along the hose.
- Inspect for leaks or dry spots and adjust placement if necessary.
Step 6: Cover the Hose (Optional)
- Apply a 1-2 inch layer of mulch over the hose to reduce evaporation, keep soil moist longer, and protect the hose from sun damage.
Tips for Optimal Performance
- Use a Timer: Automate watering with a timer to water early morning or late evening, reducing evaporation.
- Watering Duration: Most raised beds require 30-60 minutes per watering session, depending on soil type and plant needs.
- Regular Inspection: Check the hose periodically for clogs or damage.
- Winter Care: Drain and store the hose during frost to prolong lifespan.
- Avoid Overlapping Hoses: If using multiple hoses, keep them separated to prevent waterlogging.
Common Questions About Soaker Hose Installation
Can I bury the soaker hose in the raised bed soil?
Yes, burying the hose 1-2 inches below the soil surface can improve water efficiency by minimizing evaporation. However, ensure it remains accessible for maintenance.
Will a soaker hose work with drip irrigation?
Soaker hoses and drip irrigation are both efficient but function differently. You can combine both for customized watering, but they require different connectors and management.
How often should I water with a soaker hose?
Frequency depends on plant type, soil, and weather. Typically, watering 2-3 times per week is sufficient, but always monitor soil moisture.
Real-World Example: Successful Raised Bed Irrigation
A community garden in Oregon installed soaker hoses in all raised beds and reported a 30% reduction in water usage over the growing season. Gardeners noted healthier plants with deep, consistent watering and less time spent manually watering. Using timers and mulch further enhanced efficiency.
Conclusion
Installing a soaker hose in your raised garden bed is a smart investment for water conservation and healthier plants. By carefully planning the layout, selecting the right hose, and following the installation steps outlined above, you can enjoy efficient, low-maintenance irrigation all season long. Remember to monitor your system regularly and adjust watering schedules based on plant needs and weather conditions. Start your soaker hose installation today and watch your raised garden thrive with minimal effort!
Take Action: Ready to upgrade your garden’s watering system? Gather your materials and put these expert tips into practice. Your plants will thank you with vibrant growth and abundant harvests!
