Garden sprayers are essential tools for maintaining healthy plants, applying fertilizers, pesticides, and herbicides efficiently. However, like any equipment, they can develop issues over time, affecting their performance. Knowing how to fix a garden sprayer can save you money, reduce downtime, and help maintain a thriving garden.
In this guide, we will walk you through common problems with garden sprayers, practical troubleshooting tips, and step-by-step repair instructions. Whether your sprayer won’t spray, leaks, or has a clogged nozzle, we cover everything you need to get it working like new again.
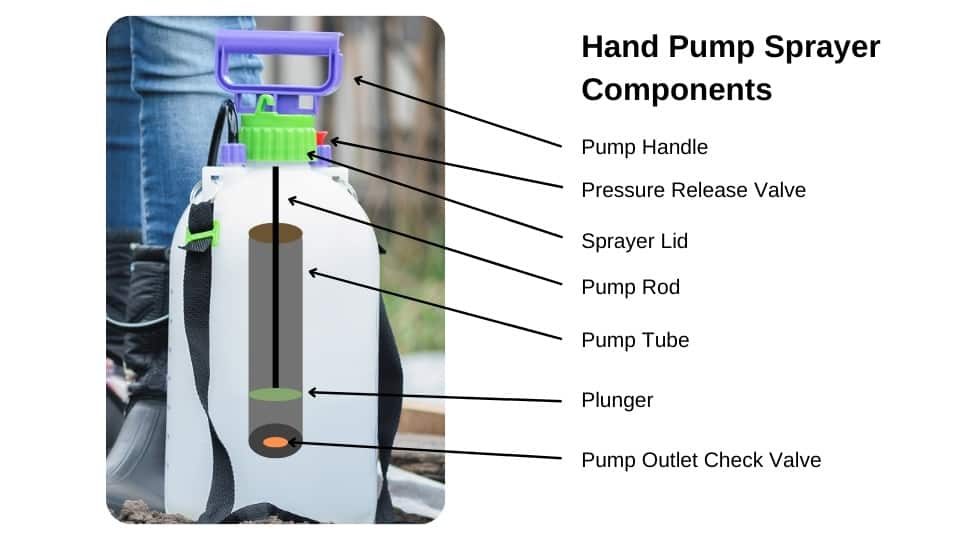
Common Problems with Garden Sprayers and How to Identify Them
Before fixing a garden sprayer, it’s important to diagnose the issue accurately. Here are the most frequent problems users encounter:
1. Sprayer Won’t Spray or Has Low Pressure
- Cause: Clogged nozzles, blocked filters, or air leaks.
- Symptoms: No liquid comes out, or spray is weak and inconsistent.
2. Leaking Sprayer
- Cause: Damaged seals, cracked tanks, or loose fittings.
- Symptoms: Liquid leaks from the tank, hose, or pump area.
3. Pump Handle or Trigger Issues
- Cause: Worn-out or broken pump parts.
- Symptoms: Pump handle won’t move properly or feels stuck.
4. Uneven Spray Pattern
- Cause: Dirty or damaged nozzles.
- Symptoms: Spray is patchy or sprays in unintended directions.
Step-by-Step Guide to Fixing Your Garden Sprayer
Step 1: Clean the Nozzle and Filters
A clogged nozzle is the most common cause of poor spray performance.
- Remove the nozzle tip carefully.
- Soak it in warm, soapy water for 15-20 minutes.
- Use a soft brush or a toothpick to clear any debris inside the nozzle hole.
- Rinse thoroughly and reattach.
Tip: Regular cleaning after every use prevents buildup and prolongs sprayer life.
Step 2: Inspect and Replace Seals and Gaskets
Leaking often results from worn rubber seals.
- Open the pump housing and check all O-rings and gaskets for cracks or wear.
- Replace any damaged seals with new ones from the manufacturer or a compatible set.
- Apply a thin layer of silicone grease to new seals for better sealing and easier installation.
Step 3: Check for Air Leaks
Air leaks reduce pressure and cause spraying problems.
- Tighten all hose connections and fittings.
- Inspect hoses for cracks or holes; replace if necessary.
- Submerge the sprayer tank in water and look for bubbles indicating leaks.
Step 4: Repair or Replace the Pump
If the pump handle is stuck or doesn’t build pressure:
- Disassemble the pump mechanism following the user manual.
- Clean internal parts to remove dirt and residue.
- Check the pump piston for damage; replace if worn out.
- Lubricate moving parts with a water-resistant lubricant.
Step 5: Test the Sprayer
After repairs:
- Fill the tank with clean water.
- Pump the handle and test the spray pattern.
- Adjust the nozzle for the desired spray width.
- Check for leaks and pressure consistency.
Preventive Maintenance Tips for Long-Lasting Garden Sprayers
Maintaining your garden sprayer regularly can avoid most issues:
- Rinse the tank and nozzle after each use to prevent chemical buildup.
- Store sprayers in a cool, dry place away from direct sunlight.
- Inspect seals and hoses before every use.
- Use filtered water to reduce sediment and clogging.
- Lubricate pump parts seasonally to keep them moving smoothly.
When to Replace Your Garden Sprayer
Despite repairs, sometimes replacement is more cost-effective. Consider buying a new sprayer if:
- The tank is cracked beyond repair.
- Multiple parts break down repeatedly.
- The cost of replacement parts exceeds half the price of a new sprayer.
- You need upgraded features like adjustable pressure or different nozzle types.
Expert Advice on Choosing Quality Replacement Parts
Using the right parts ensures your sprayer functions properly and lasts longer.
- Buy OEM (Original Equipment Manufacturer) parts when possible for guaranteed compatibility.
- Check for high-quality rubber seals that resist chemicals and UV damage.
- Invest in nozzles with adjustable spray patterns for versatility.
- Read user reviews and consult gardening forums for recommendations.
Conclusion
Fixing a garden sprayer yourself is straightforward once you know what to look for. By cleaning clogged nozzles, replacing worn seals, checking for leaks, and maintaining the pump, you can restore your sprayer’s efficiency and extend its life. Regular maintenance prevents most common issues, saving time and money.
Next time your garden sprayer acts up, follow this guide to troubleshoot and repair it confidently. A well-functioning sprayer helps you care for your garden effectively, ensuring lush, healthy plants season after season.
Ready to get your garden sprayer back in action? Start with a thorough cleaning and inspection today!
Quick Reference: How to Fix Garden Sprayer Checklist
| Problem | Cause | Solution |
|————————-|——————————–|————————————-|
| No spray or low pressure | Clogged nozzle or filter | Clean nozzle/filter; check for leaks|
| Leaks | Worn seals or cracked tank | Replace seals; tighten fittings |
| Pump handle stuck | Damaged pump parts | Clean and lubricate; replace parts |
| Uneven spray pattern | Dirty or damaged nozzle | Clean or replace nozzle |
By following these expert-backed steps, you ensure your garden sprayer remains a reliable tool in your gardening arsenal.
