Rain gardens are an effective, eco-friendly way to manage stormwater runoff, improve local water quality, and enhance your landscape’s beauty. Constructing a rain garden might seem daunting at first, but with the right guidance, it becomes an achievable and rewarding project. In this comprehensive guide, we will walk you through how to construct a rain garden, covering everything from site selection to plant choice, ensuring your garden performs optimally and looks stunning.
Introduction
Stormwater runoff is a growing environmental concern, contributing to water pollution and flooding. A rain garden offers a natural solution by capturing and filtering rainwater where it falls. Not only does it reduce runoff, but it also supports biodiversity and adds aesthetic value to your property.
This article will explain the step-by-step process of building a rain garden, backed by expert insights and proven practices. Whether you are a homeowner, landscaper, or environmental enthusiast, you will learn how to design, build, and maintain a rain garden that benefits your local ecosystem and beautifies your outdoor space.
What is a Rain Garden and Why is it Important?
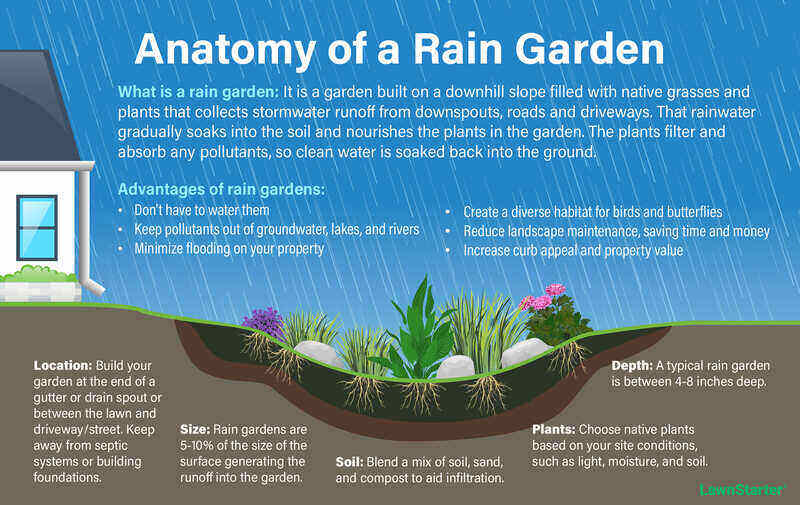
A rain garden is a shallow, planted depression designed to collect and absorb rainwater runoff from impervious surfaces like roofs, driveways, and sidewalks. Instead of water flowing directly into storm drains and waterways, it filters through soil and plant roots, reducing pollutants and preventing erosion.
Key Benefits of Rain Gardens:
- Reduces stormwater runoff and flooding
- Filters pollutants and improves water quality
- Recharges groundwater supplies
- Provides habitat for pollinators and wildlife
- Enhances landscape aesthetics
Step 1: Choose the Right Location for Your Rain Garden
Selecting an appropriate site is crucial for an effective rain garden. Consider these factors:
- Proximity to Downspouts or Impervious Surfaces: Position the garden to capture runoff efficiently.
- Soil Type: Well-draining soils like sandy or loamy types work best.
- Slope: Ideally, choose a gentle slope of 2-12% to allow water to flow into the garden without causing erosion.
- Distance from Structures: Maintain at least 10 feet from building foundations to prevent water damage.
- Sun Exposure: Most rain garden plants thrive in full to partial sun.
How to Test Your Soil Drainage:
- Dig a hole about 12 inches deep.
- Fill it with water and let it drain completely.
- Refill and time how long it takes to drain.
- If water drains within 24 hours, the site is suitable.
Step 2: Design Your Rain Garden Layout
Designing involves determining the size, shape, and depth of your rain garden.
Sizing Your Rain Garden
A general rule is that the rain garden should be about 20-30% the size of the area draining into it. For example, if your roof area is 1,000 sq. ft., your rain garden should be roughly 200-300 sq. ft.
Depth Guidelines:
- Typical rain garden depth ranges from 4 to 8 inches.
- Deeper gardens hold more water but require more robust soil and plant choices.
Shape Considerations:
- Natural, curved shapes blend better with landscapes.
- Avoid sharp corners, which can cause erosion.
Step 3: Prepare the Site and Soil
Clearing and Excavation
- Remove grass, weeds, and debris from the garden area.
- Excavate to the planned depth, creating a shallow basin.
Soil Amendment
- Test soil texture. Rain garden soil should be sandy loam for optimal drainage.
- If clay-heavy, amend with compost and sand to improve permeability.
- Incorporate organic matter (30-50%) to support plant health.
Step 4: Select Native Plants for Your Rain Garden
Plants are fundamental to the success of a rain garden. Native plants are preferred because they adapt to local conditions, require less maintenance, and support local wildlife.
Ideal Plant Characteristics:
- Tolerate both wet and dry conditions.
- Have deep root systems to improve soil infiltration.
- Provide seasonal interest with flowers, foliage, or berries.
Plant Categories:
- Bottom (Wet) Zone Plants: Tolerate standing water (e.g., Blue Flag Iris, Swamp Milkweed).
- Middle (Moist) Zone Plants: Thrive in moist but not saturated soil (e.g., Joe-Pye Weed, Black-eyed Susan).
- Upper (Dry) Zone Plants: Prefer drier soil on garden edges (e.g., Purple Coneflower, Little Bluestem).
Step 5: Planting and Mulching
Planting Tips:
- Group plants by moisture tolerance for best results.
- Space plants according to their mature size.
- Plant in clusters to mimic natural ecosystems.
Mulching:
- Use a 2-3 inch layer of shredded hardwood mulch.
- Mulch helps retain moisture, suppress weeds, and reduce soil erosion.
- Avoid using pine or cedar mulch, which can alter soil pH.
Step 6: Maintenance for a Thriving Rain Garden
Maintenance ensures your rain garden continues to function and flourish.
Key Maintenance Tasks:
- Watering: Water regularly during the first establishment year.
- Weeding: Remove invasive species and weeds promptly.
- Mulch Renewal: Replenish mulch annually.
- Debris Removal: Clear leaves and trash to maintain water flow.
- Plant Replacement: Replace dead or unhealthy plants as needed.
Expert Tips for Success
- Avoid Compacting Soil: Keep soil loose during construction to promote infiltration.
- Consider Overflow: Design an overflow outlet to channel excess water safely during heavy rain.
- Monitor Performance: After storms, observe how water flows and adjust as necessary.
- Involve Professionals: Consult local extension services or landscape professionals for site-specific advice.
Frequently Asked Questions (FAQs)
Q: Can I build a rain garden on clay soil?
A: Yes, but you will need to amend the soil with sand and organic matter to improve drainage.
Q: How much does it cost to build a rain garden?
A: Costs vary widely depending on size, plants, and materials but typically range from $3 to $10 per square foot when DIY.
Q: Do rain gardens attract mosquitoes?
A: Properly designed rain gardens drain within 24-48 hours, minimizing mosquito breeding.
Conclusion
Constructing a rain garden is a practical, beautiful way to manage stormwater, protect the environment, and add value to your property. By following the steps outlined—site selection, design, soil preparation, planting, and maintenance—you can build a resilient rain garden that benefits you and your community.
Take action today: Start planning your rain garden and join the movement toward sustainable landscaping. Your efforts will help conserve water, support wildlife, and create a greener, healthier environment.
Embrace the power of rain gardens as a simple yet effective solution for stormwater management. With thoughtful design and care, your rain garden will thrive, making a positive impact for years to come.
