Creating steps in your garden is an excellent way to enhance its beauty, improve accessibility, and prevent soil erosion. Whether your garden slopes gently or has a steep incline, well-built steps can transform your outdoor space into a safe, inviting, and visually appealing area. In this guide, we’ll walk you through how to build steps in the garden, covering everything from planning and materials to construction and finishing touches.
Why Build Steps in Your Garden?
Garden steps serve multiple purposes beyond aesthetics:
- Safety: They provide secure footing on uneven terrain.
- Accessibility: Steps make it easier for everyone to navigate your garden.
- Erosion Control: Properly constructed steps help prevent soil washout.
- Design Element: They add structure and highlight landscape features.
Building garden steps may sound challenging, but with the right approach, it becomes a manageable DIY project that adds lasting value to your outdoor space.
How to Build Steps in the Garden: Planning and Preparation
1. Assess the Site and Measure the Slope
Before you start building, evaluate the garden’s slope and decide where the steps will go. Use a tape measure and a level or a laser level to measure:
- Total vertical height (rise) you need to cover.
- Horizontal distance (run) available for the steps.
2. Determine Step Dimensions
Standard step dimensions are:
- Riser height: 6-7 inches (15-18 cm) – the vertical part of the step.
- Tread depth: 10-12 inches (25-30 cm) – the horizontal part where you step.
Maintaining consistent riser height ensures safety and comfort.
3. Choose Your Materials
Your material choice affects both the look and durability of the steps. Common options include:
- Natural stone: Durable and blends well with garden aesthetics.
- Brick: Classic look, easy to work with.
- Concrete: Versatile and cost-effective.
- Wood: Warm and natural but requires maintenance.
- Gravel with timber edges: Rustic and good for drainage.
Consider the garden style, budget, and maintenance when selecting materials.
Step-by-Step Guide: Building Garden Steps
Step 1: Mark Out the Steps
Use stakes and string to outline the path of your steps. Mark each step’s edge clearly.
Step 2: Excavate the Area
Dig out the soil where each step will sit. Remove roots, rocks, and debris. The excavation depth depends on the step height plus base material.
Step 3: Lay a Solid Foundation
For stability and longevity:
- Add a 4-6 inch (10-15 cm) layer of compacted gravel or crushed stone as a base.
- Use a tamper to compact the base firmly.
Step 4: Build the Steps
For stone or brick steps:
- Lay the first row of stones/bricks on a mortar bed or compacted base.
- Check for level and alignment.
- Continue stacking layers, ensuring each riser is consistent in height.
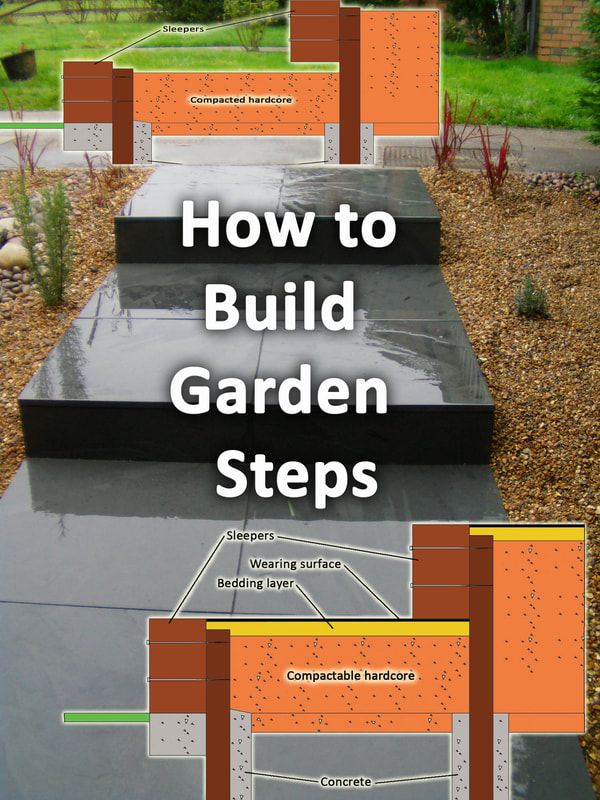
For timber steps:
- Secure timber sleepers with stakes or concrete footings.
- Fill the step surface with gravel or soil for traction.
Step 5: Add Finishing Touches
- Backfill behind steps with soil to prevent shifting.
- Add edging or handrails if needed for safety.
- Apply sealant to wood or stone for weather protection.
Tips for Building Durable and Safe Garden Steps
- Keep risers consistent: Uneven steps can cause trips.
- Ensure good drainage: Prevent water pooling by sloping steps slightly forward.
- Use quality materials: Avoid shortcuts to extend step lifespan.
- Consider lighting: Solar or low-voltage lights increase visibility at night.
- Add non-slip surfaces: Gravel, textured stone, or anti-slip coatings improve safety.
Real-World Example: Transforming a Sloped Garden with Stone Steps
Jane, a homeowner in Portland, Oregon, transformed her steep backyard slope by installing natural stone steps. She measured her slope carefully, chose local basalt stones for sustainability, and built steps with a 6-inch riser and 11-inch tread. Jane compacted a gravel base and added drainage pipes behind the steps, preventing erosion during heavy rains. The result was a beautiful, functional staircase that increased garden usability and property value.
Frequently Asked Questions (FAQs)
Q1: How many steps do I need for my garden slope?
Divide the total vertical height by your desired riser height. For example, a 36-inch height with 6-inch risers requires 6 steps.
Q2: Can I build garden steps on a very steep slope?
Yes, but consider adding landings or switchback designs to reduce steepness and improve safety.
Q3: How long do garden steps usually last?
With proper materials and maintenance, stone or concrete steps can last decades. Wood may need replacement every 5-10 years.
Conclusion: Creating Steps That Enhance Your Garden’s Beauty and Function
Building steps in your garden is a rewarding project that combines practicality with aesthetic appeal. By carefully planning, choosing the right materials, and following proper construction techniques, you can create durable, safe, and attractive steps that enhance your outdoor experience. Remember, consistent riser heights, solid foundations, and good drainage are key to success. Take the time to design thoughtfully, and your garden steps will serve you beautifully for years to come.
Ready to start your garden transformation? Gather your tools, plan your layout, and take the first step toward a more accessible and stunning garden today!
