Introduction
Building a garden gate is a rewarding project that enhances the security, privacy, and charm of your outdoor space. Whether you want a classic wooden gate or a sleek metal design, understanding the process of garden gate construction can save you considerable time and expense. This comprehensive guide will walk homeowners and DIY enthusiasts through the essentials—from choosing the right gate type and materials to navigating local building codes and permits. You’ll also learn about the tools and hardware needed, proper installation techniques, and maintenance tips to ensure your garden gate stands the test of time.
By the end of this guide, you’ll confidently know how to build a garden gate tailored to your garden’s style and climate, be it a weatherproof wooden gate or a durable metal gate installation. We’ll also cover cost estimation and practical advice to avoid common pitfalls. Let’s dive into the practical steps that will bring your garden gate project from concept to reality.
Types of Garden Gates and Materials
Garden gates vary widely in style and material, affecting durability, maintenance, and appearance. The two most popular materials are wood and metal, each with distinct benefits.
Wooden Garden Gates offer a natural, warm look that complements greenery well. Common wood types include cedar, redwood, and pressure-treated pine, valued for their resistance to decay. Wooden gates are easier to customize with designs and can be stained or painted to match your garden aesthetic.
Metal Garden Gates, often made from aluminum, wrought iron, or steel, provide greater durability and security. Aluminum is lightweight and rust-resistant, while wrought iron offers classic elegance but requires regular maintenance to prevent corrosion. Steel gates are strong but heavier and may need weatherproof coatings.
When choosing materials, consider your local climate. For example, the USDA recommends weather-resistant gate materials in humid or rainy regions to minimize rot and rust. Additionally, the American Fence Association highlights that gate longevity depends heavily on proper material selection and finishing.
Key Material Considerations:
- Wood: Choose rot-resistant species; treat with sealant
- Metal: Opt for powder-coated finishes to prevent rust
- Composite: A blend of wood fibers and plastics offers low maintenance
Understanding these material options will help you select a gate type that balances aesthetics, durability, and upkeep.
Tools and Supplies Needed
Before starting your garden gate construction, gather the essential tools and supplies for a smooth workflow. Having the right equipment ensures precision and safety.
Essential Tools:
- Measuring tape and carpenter’s square for accurate measurements
- Circular saw or miter saw for clean cuts
- Power drill with screwdriver bits
- Level to ensure vertical and horizontal alignment
- Hammer and nails or nail gun
- Clamps to hold pieces during assembly
- Shovel and post hole digger for setting posts
Hardware and Supplies:
- Garden gate hinges (heavy-duty, weather-resistant recommended)
- Garden gate latch (choose from gravity latches, thumb latches, or bolt latches)
- Wood screws or galvanized fasteners
- Weatherproof wood sealant or paint
- Concrete mix for securing posts
Planning your tools and supplies ahead of time prevents delays and substandard results. For gate hardware, investing in quality brands or products certified by the American Fence Association can improve longevity significantly.
Step-by-Step Garden Gate Construction Process
Building a garden gate involves precise measuring, cutting, assembly, and finishing. Here’s a detailed process to guide you through:
-
Measure the Gate Opening: Accurately measure the width and height of the opening where the gate will be installed. Allow for ½ to 1 inch clearance on all sides for smooth swinging.
-
Design and Plan: Sketch your gate design considering style and material. Refer to wooden garden gate plans or metal gate templates for inspiration.
-
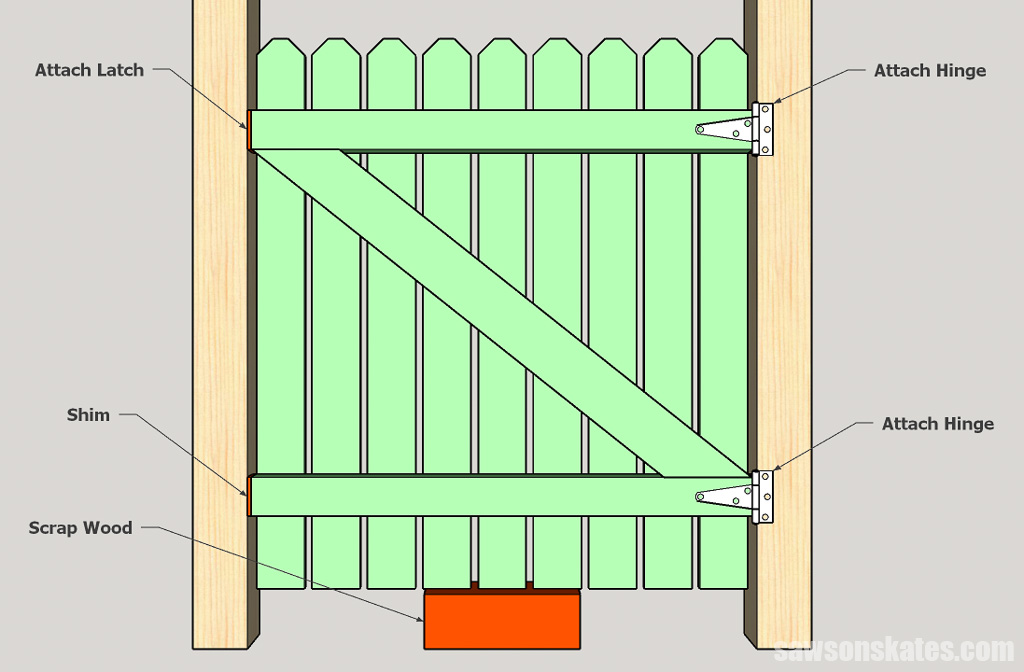
Cut the Frame and Panels: Using your saw, cut the frame components (rails and stiles) and panels to size. For wooden gates, diagonal bracing prevents sagging.
-
Assemble the Frame: Join the rails and stiles using screws or nails. Add diagonal braces securely.
-
Attach Panels: Fix the panels within the frame using screws, ensuring they are flush.
-
Sand and Finish: Smooth edges and surfaces with sandpaper. Apply a weatherproof sealant or paint.
-
Install Hardware: Attach hinges and latch to the gate, ensuring alignment with the post.
-
Prepare Gate Posts: Dig holes for posts, at least 2 feet deep. Pour concrete to set posts firmly.
-
Hang the Gate: Mount the gate on the posts using hinges. Adjust for level and smooth operation.
Quick Tips:
- Use galvanized or stainless steel hardware to prevent rust
- Confirm swing direction before installing hinges
- Consider self-closing hinges for convenience
This stepwise approach, adhering to recommended measurements and materials, will yield a sturdy, attractive garden gate.
Local Building Codes and Permits
Before breaking ground, check your local building codes regarding gate construction. Regulations vary by municipality and may affect gate height, placement, and materials.
The University of Minnesota Extension advises homeowners to inquire about necessary building permits and easement restrictions. Some areas require permits for gates exceeding certain dimensions or if attached to fencing.
What to Do:
- Contact your city or county building department
- Confirm setback requirements and height limits
- Obtain permits if required
- Verify compliance with neighborhood covenants or HOA rules
Following local regulations not only ensures legal compliance but also prevents costly rework.
Gate Installation and Hardware Options
Proper installation is crucial for gate functionality and longevity. Choosing the right hardware facilitates smooth operation.
Types of Garden Gate Hinges:
- Strap Hinges: Long, decorative, ideal for wooden gates
- Butt Hinges: Compact, suitable for metal gates
- Self-Closing Hinges: Include springs for automatic closing
Gate Latch Types:
- Gravity Latch: Simple, easy to install
- Thumb Latch: Traditional look with a lever
- Bolt Latch: Provides extra security
Hardware should be rust-resistant and rated for outdoor use. The American Fence Association recommends heavy-duty hinges and latches for gates exposed to frequent use or harsh weather.
Maintenance Tips for Garden Gates
To keep your garden gate in top condition, regular maintenance is key.
- Inspect hinges and latches every 6 months for rust or wear
- Lubricate moving parts with silicone spray
- Reapply wood sealant or paint every 2–3 years
- Check post stability annually, especially after storms
Proper upkeep extends the life of your gate and preserves its appearance.
Cost Estimation and Budgeting
Costs vary depending on material, size, and hardware quality.
- Wooden gates typically range from $150 to $500 in materials
- Metal gates can cost $300 to $1,000 or more
- Hardware sets usually cost $30 to $100
- Additional expenses include concrete for posts and paint/sealant
DIY construction saves labor costs but requires investment in tools if not already owned. Budgeting realistically helps prevent surprises.
How I’d Do It
Based on my hands-on experience, I recommend starting with detailed measurements and a clear design plan. Use weather-resistant cedar for wooden gates in humid climates and pair it with stainless steel hinges and latches. Always set posts in concrete to avoid shifting due to soil conditions. Take time to sand and seal the wood thoroughly for a professional finish. Lastly, test your gate’s swing before finalizing hardware installation.
Common Pitfalls to Avoid
- Skipping precise measurements leading to misfit gates
- Using low-quality hardware prone to rust
- Ignoring local building codes or permits
- Neglecting post stability or soil conditions
- Failing to protect wood from moisture
Avoiding these mistakes ensures a durable, functional gate.
Checklist for Building Your Garden Gate
- [ ] Measure gate opening accurately
- [ ] Choose appropriate materials for climate
- [ ] Obtain necessary building permits
- [ ] Gather all required tools and hardware
- [ ] Cut and assemble gate components
- [ ] Apply weatherproof finish
- [ ] Set and secure gate posts properly
- [ ] Install hinges and latch
- [ ] Test gate swing and adjust
- [ ] Schedule regular maintenance
Tools and Metrics Summary
| Tool | Purpose |
|---|---|
| Measuring Tape | Accurate dimensions |
| Carpenter’s Square | Square corners |
| Circular or Miter Saw | Cutting wood or metal |
| Power Drill | Drilling and fastening |
| Level | Ensuring vertical/horizontal alignment |
| Post Hole Digger/Shovel | Setting gate posts |
FAQs
What is the best material for a garden gate in a rainy climate?
For rainy or humid climates, rot-resistant woods like cedar or redwood are excellent choices. Alternatively, powder-coated aluminum gates resist rust effectively. Applying a quality sealant or paint further protects wood materials.
Do I need a building permit to install a garden gate?
Permit requirements vary by location. Many municipalities require permits if the gate exceeds specific dimensions or is attached to a fence. Check with your local building department before starting your project.
How do I prevent my wooden gate from sagging?
Incorporate a diagonal brace from the bottom hinge side to the opposite top corner during assembly. This brace distributes weight and prevents sagging over time.
What type of latch is best for a garden gate?
A thumb latch combines ease of use with classic aesthetics, while a bolt latch offers enhanced security. For self-closing convenience, consider a gravity latch paired with spring-loaded hinges.
How long does it typically take to build a garden gate?
For a beginner with preparation, building a basic wooden garden gate can take 1–2 days, including drying times for finishes. Metal gate installations may require more time and specialized tools.
Key Takeaways
Building a garden gate is a manageable DIY project that enhances your outdoor space’s functionality and curb appeal. Selecting the right materials and hardware, adhering to local codes, and following a systematic construction process are essential to success. Quality tools and careful planning prevent common pitfalls such as sagging gates or rusted hardware. Routine maintenance prolongs your gate’s lifespan, keeping it secure and attractive for years. Whether opting for traditional wooden gate plans or a modern metal gate installation, this guide equips you with the knowledge and confidence to build a durable, beautiful garden gate.
References
- USDA. “Fencing and Gates: Materials and Design Considerations.” https://www.usda.gov/topics/fencing-and-gates
- University of Minnesota Extension. “Building Garden Gates.” https://extension.umn.edu/garden-gates
- American Fence Association. “Fence and Gate Installation Guidelines.” https://www.americanfenceassociation.com/installation-guidelines
