Creating an elevated garden bed on legs is a smart and stylish approach to gardening that offers numerous benefits. Whether you have limited space, poor soil quality, or mobility concerns, building garden beds raised on legs can enhance accessibility, improve drainage, and add a charming focal point to your outdoor space. This comprehensive guide will walk you through the how-to of building elevated garden beds on legs, covering materials, design tips, construction steps, and care advice to ensure a thriving garden.
Why Build Elevated Garden Beds on Legs?
Elevated garden beds are growing in popularity because they make gardening easier and more efficient. Here are some key advantages:
- Improved Accessibility: Raised beds on legs bring plants closer to you, reducing the need to bend or kneel—ideal for elderly gardeners or those with mobility issues.
- Better Drainage: Elevation helps excess water drain away, preventing root rot and promoting healthier plants.
- Soil Control: You can fill the beds with nutrient-rich, well-draining soil, avoiding poor native soil.
- Pest Reduction: Elevating plants can deter ground-dwelling pests and weeds.
- Aesthetic Appeal: Stylish raised beds add a decorative element to patios, balconies, or small yards.
In this article, you’ll learn how to design and build your own elevated garden beds on legs, including materials, measurements, and step-by-step construction.
What You’ll Need: Materials and Tools
Before you start, gather the following essential materials and tools:
Materials
- Wood boards (cedar or redwood recommended for durability and rot resistance)
- Leg supports (wooden 4×4 posts or metal legs)
- Screws and brackets (galvanized or stainless steel to prevent rust)
- Wood sealant or outdoor paint (optional, for weatherproofing)
- Landscape fabric (to line the bed and prevent soil loss)
- Soil mix (high-quality garden soil, compost, and perlite or vermiculite)
Tools
- Power drill with screwdriver bits
- Measuring tape
- Saw (circular saw or miter saw)
- Level
- Pencil or chalk
- Safety goggles and gloves
Step 1: Plan Your Elevated Garden Bed Design
Decide on the Dimensions
- Length and width: Common sizes range from 3×2 feet to 6×3 feet, depending on available space.
- Height: Legs typically raise the bed 18 to 36 inches above ground, making it comfortable to tend without bending.
Tip: Keep beds narrow (no wider than 4 feet) so you can reach the center from either side.
Choose the Wood Type
- Cedar and redwood resist rot naturally and don’t require chemical treatment.
- Avoid treated lumber if growing edibles, or use food-safe sealants.
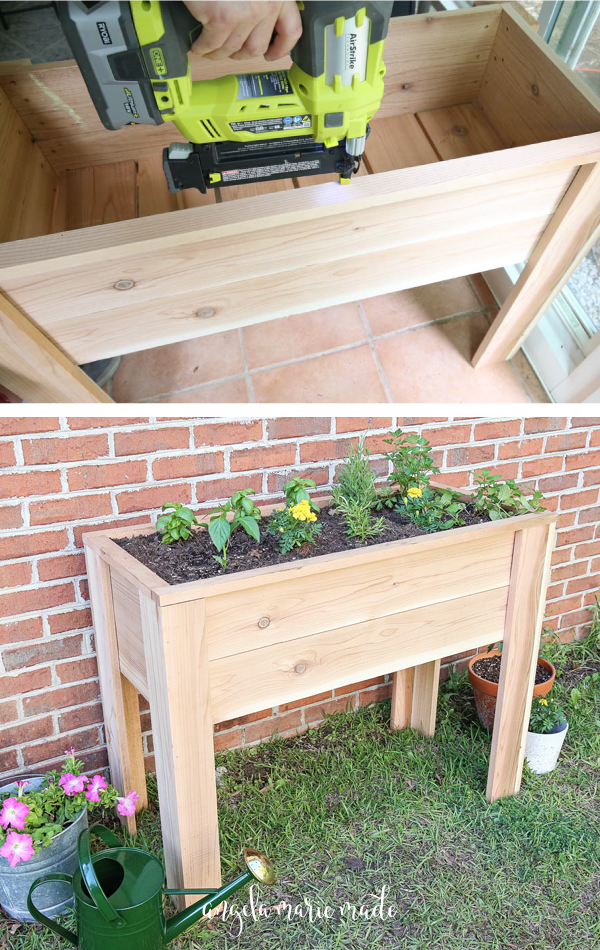
Step 2: Cut and Assemble the Bed Frame
- Cut the wood boards to your planned dimensions for the bed walls.
- Attach the boards to form a rectangular frame using screws and brackets.
- Use a level to ensure corners are square and the frame is even.
Step 3: Attach the Legs
- Cut the legs to your desired height (18-36 inches).
- Position the legs at each corner of the frame, inside or outside the frame depending on design preference.
- Secure the legs with screws and corner brackets for stability.
- For extra support, add cross braces between legs if the bed is large.
Step 4: Prepare the Bed for Soil
- Line the inside of the bed with landscape fabric to prevent soil loss and improve drainage.
- Drill a few drainage holes on the bottom if the bed has a solid base.
- Place the bed in its final location, ensuring it is level and stable.
Step 5: Fill with Soil and Plant
- Use a mix of garden soil, compost, and aerating materials like perlite to create a nutrient-rich, well-draining medium.
- Fill the bed to about 2-3 inches below the rim to prevent soil spillage.
- Plant your favorite vegetables, herbs, or flowers, keeping plant spacing in mind.
Maintenance Tips for Elevated Garden Beds on Legs
- Water regularly but avoid overwatering; elevated beds drain faster.
- Monitor for pests and install barriers if necessary.
- Replenish soil nutrients with organic fertilizers or compost every season.
- Inspect wooden legs and frame annually for signs of rot or damage; reseal or repaint if needed.
Expert Advice: Maximizing Success with Elevated Beds
- Dr. Lisa White, horticulturist, recommends using cedar wood for its natural insect resistance and longevity in outdoor conditions.
- According to a study by the University of California, raised beds warm up earlier in spring, promoting faster growth.
- For urban gardeners, elevated beds on legs can transform balconies and patios into productive gardening spaces.
Frequently Asked Questions (FAQs)
Can I build elevated garden beds on legs indoors?
Yes, provided you have adequate sunlight and drainage. Use trays underneath to catch excess water.
What soil mix is best for raised garden beds?
A balanced mix of 40% compost, 40% topsoil, and 20% aeration material like perlite is ideal.
How long do wooden elevated beds last?
High-quality cedar beds can last 10-15 years with proper maintenance and sealing.
Conclusion
Building elevated garden beds on legs is an accessible and rewarding project that enhances gardening comfort, plant health, and outdoor aesthetics. By carefully selecting materials, planning dimensions, and following step-by-step construction methods, you can create a durable, functional, and beautiful garden feature. Whether you’re a beginner or seasoned gardener, elevated beds offer a versatile solution to grow fresh vegetables, herbs, and flowers with ease. Start your project today, and enjoy the benefits of elevated gardening for years to come!
Ready to build your own elevated garden bed? Gather your tools, pick your wood, and transform your garden space with this practical and attractive gardening upgrade!
