Converting a garden tub into a shower is an excellent way to update your bathroom, improve accessibility, and increase home value. Garden tubs, while luxurious, often take up significant space and can be difficult to use for everyday showering. Transforming this space into a functional shower not only modernizes your bathroom but also enhances convenience, especially for families or individuals with mobility challenges.
In this guide, we will walk you through the entire process of converting a garden tub into a shower. From planning and selecting materials to professional tips and installation steps, you’ll gain expert insight to make this renovation smooth and successful. Whether you’re a DIY enthusiast or planning to hire a contractor, this article covers everything you need to know to achieve a stylish, practical shower replacement.
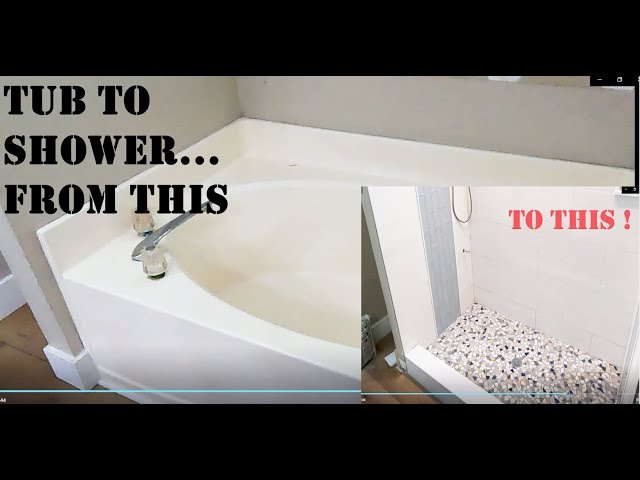
Why Convert a Garden Tub Into a Shower?
Before diving into the conversion process, it’s essential to understand the benefits of replacing a garden tub with a shower:
- Space Efficiency: Showers typically occupy less floor space, freeing room for storage or other bathroom features.
- Accessibility: Walk-in showers are easier to enter and exit, which is ideal for elderly or disabled individuals.
- Water Conservation: Showers generally use less water than filling a large tub, making them eco-friendly.
- Modern Appeal: A sleek shower can update your bathroom’s look and boost your home’s market value.
Step 1: Assess Your Current Bathroom Setup
Converting a garden tub to a shower starts with a thorough assessment:
- Measure the space: Determine the exact dimensions of your garden tub and surrounding area.
- Check plumbing locations: Identify where the water supply and drain lines are; this impacts how much rerouting is needed.
- Evaluate wall conditions: Inspect for water damage or mold behind the tub walls, which may require repair before installation.
- Decide on shower type: Choose between a walk-in shower, a shower-tub combo, or a curb-less design based on space and preference.
Step 2: Plan Your Shower Design and Materials
Choosing the right design and materials is crucial for a successful conversion. Consider the following:
Shower Base Options
- Prefab shower pans: Easy to install and waterproof, available in various sizes.
- Custom-tiled shower floor: Offers a personalized look but requires skilled labor.
- Curb-less shower base: Ideal for accessibility but may need floor slope adjustments.
Wall Materials
- Ceramic or porcelain tile: Durable and water-resistant, with countless design options.
- Acrylic or fiberglass panels: Cost-effective and quick to install.
- Natural stone: Luxurious but requires maintenance and sealing.
Doors and Enclosures
- Sliding glass doors: Space-saving and modern.
- Frameless glass panels: Create an open, airy feel.
- Curtains: Budget-friendly but less durable.
Step 3: Prepare the Workspace and Remove the Garden Tub
Removing the existing tub is a labor-intensive but essential step:
- Turn off water supply: Prevent leaks during demolition.
- Remove fixtures: Detach faucets, showerheads, and any accessories.
- Cut drywall or tiles around the tub: Carefully expose plumbing and framing.
- Disconnect plumbing: Remove drain and water lines from the tub.
- Demolish and remove the tub: Use appropriate tools to safely extract the tub.
Tip: Wear protective gear and dispose of debris responsibly.
Step 4: Modify Plumbing and Drainage
Your shower’s functionality depends on proper plumbing adjustments:
- Adjust water supply lines: Position controls at a convenient height for shower use.
- Install a shower valve: Choose a thermostatic valve for consistent water temperature.
- Replace or modify drain: A shower drain is typically smaller and may require repositioning.
- Ensure proper waterproofing: Apply waterproof membranes or backer boards to prevent leaks.
Expert advice: Hiring a licensed plumber is recommended unless you have significant experience.
Step 5: Install Shower Base and Walls
With plumbing ready, it’s time to install the shower foundation:
- Place the shower pan: Level it carefully to ensure proper drainage.
- Build or install walls: Attach waterproof backer board and finish with chosen materials (tile, panels, etc.).
- Seal all joints and edges: Use high-quality silicone caulk to prevent water infiltration.
Step 6: Add Shower Fixtures and Enclosure
Finalize your new shower with fixtures and doors:
- Install showerhead and controls: Test for leaks and proper water flow.
- Mount shower doors or curtains: Securely fit enclosures to avoid water splashing.
- Add accessories: Consider grab bars, shelves, and seating for enhanced convenience.
Cost and Time Considerations
- DIY vs. professional installation: DIY can save money but requires skill; professionals ensure code compliance and quality.
- Average cost range: $2,000 to $7,000 depending on materials and labor.
- Project timeline: Expect 3 to 7 days, depending on complexity.
Frequently Asked Questions (FAQs)
Q1: Can I convert a garden tub to a shower without moving plumbing?
Yes, if your current plumbing aligns with your new shower layout, minimal adjustments are needed.
Q2: Is a walk-in shower better for resale value?
Generally, walk-in showers are popular and can increase home value due to modern appeal and accessibility.
Q3: How do I waterproof the shower area properly?
Use waterproof backer boards, membranes, and sealants behind tiles or panels to prevent moisture damage.
Conclusion
Converting a garden tub into a shower is a practical, stylish upgrade that improves bathroom functionality and accessibility. By carefully assessing your space, selecting durable materials, and following the proper installation steps, you can create a beautiful shower that meets your needs and enhances your home’s value. Whether you tackle the project yourself or hire professionals, planning and attention to detail are key. Ready to transform your bathroom? Start by envisioning your ideal shower design and take the first step toward a more modern, efficient space today.
