A leaky garden tap is more than just an annoyance—it can lead to wasted water, higher bills, and potential damage to your outdoor plumbing. If you’ve noticed a constant drip or drip-drop sound from your garden tap, it’s time to take action. Fixing a leaky garden tap is a straightforward task that many homeowners can handle themselves with a few basic tools and some guidance.
In this comprehensive guide, we’ll walk you through the common causes of a leaky garden tap and provide clear, step-by-step instructions to fix it. Whether you’re dealing with a dripping spout, a faulty washer, or a worn-out valve, this article covers all the essential troubleshooting tips and repair techniques. By the end, you’ll be equipped to stop that leak efficiently, saving water and money while maintaining your outdoor plumbing system’s integrity.
Why Is My Garden Tap Leaking?
Before jumping into repairs, it’s important to understand why your garden tap is leaking. Common reasons include:
- Worn or damaged washers: The rubber or silicone washer inside the tap can degrade over time, losing its seal.
- Loose or damaged valve seat: The valve seat can corrode or crack, preventing a tight seal.
- Faulty O-rings: These small rings help create a watertight seal around the valve stem.
- High water pressure: Excessive pressure can cause leaks around the tap.
- Cracks in the tap body: Physical damage from freezing or impact can create leaks.
Identifying the root cause helps you select the right repair method.
Tools and Materials You’ll Need
Before starting, gather the following tools and supplies:
- Adjustable wrench or spanner
- Screwdriver (flathead or Phillips depending on your tap)
- Replacement washers and O-rings (available at hardware stores)
- Valve seat wrench (optional but helpful)
- PTFE (Teflon) tape
- Cloth or rag
- Bucket or container (to catch water)
Having everything ready makes the repair process smoother and quicker.
Step-by-Step Guide: How to Fix a Leaky Garden Tap
1. Turn Off the Water Supply
- Locate the stopcock or main water valve and turn off the water supply to the garden tap.
- Open the garden tap fully to drain any remaining water and relieve pressure.
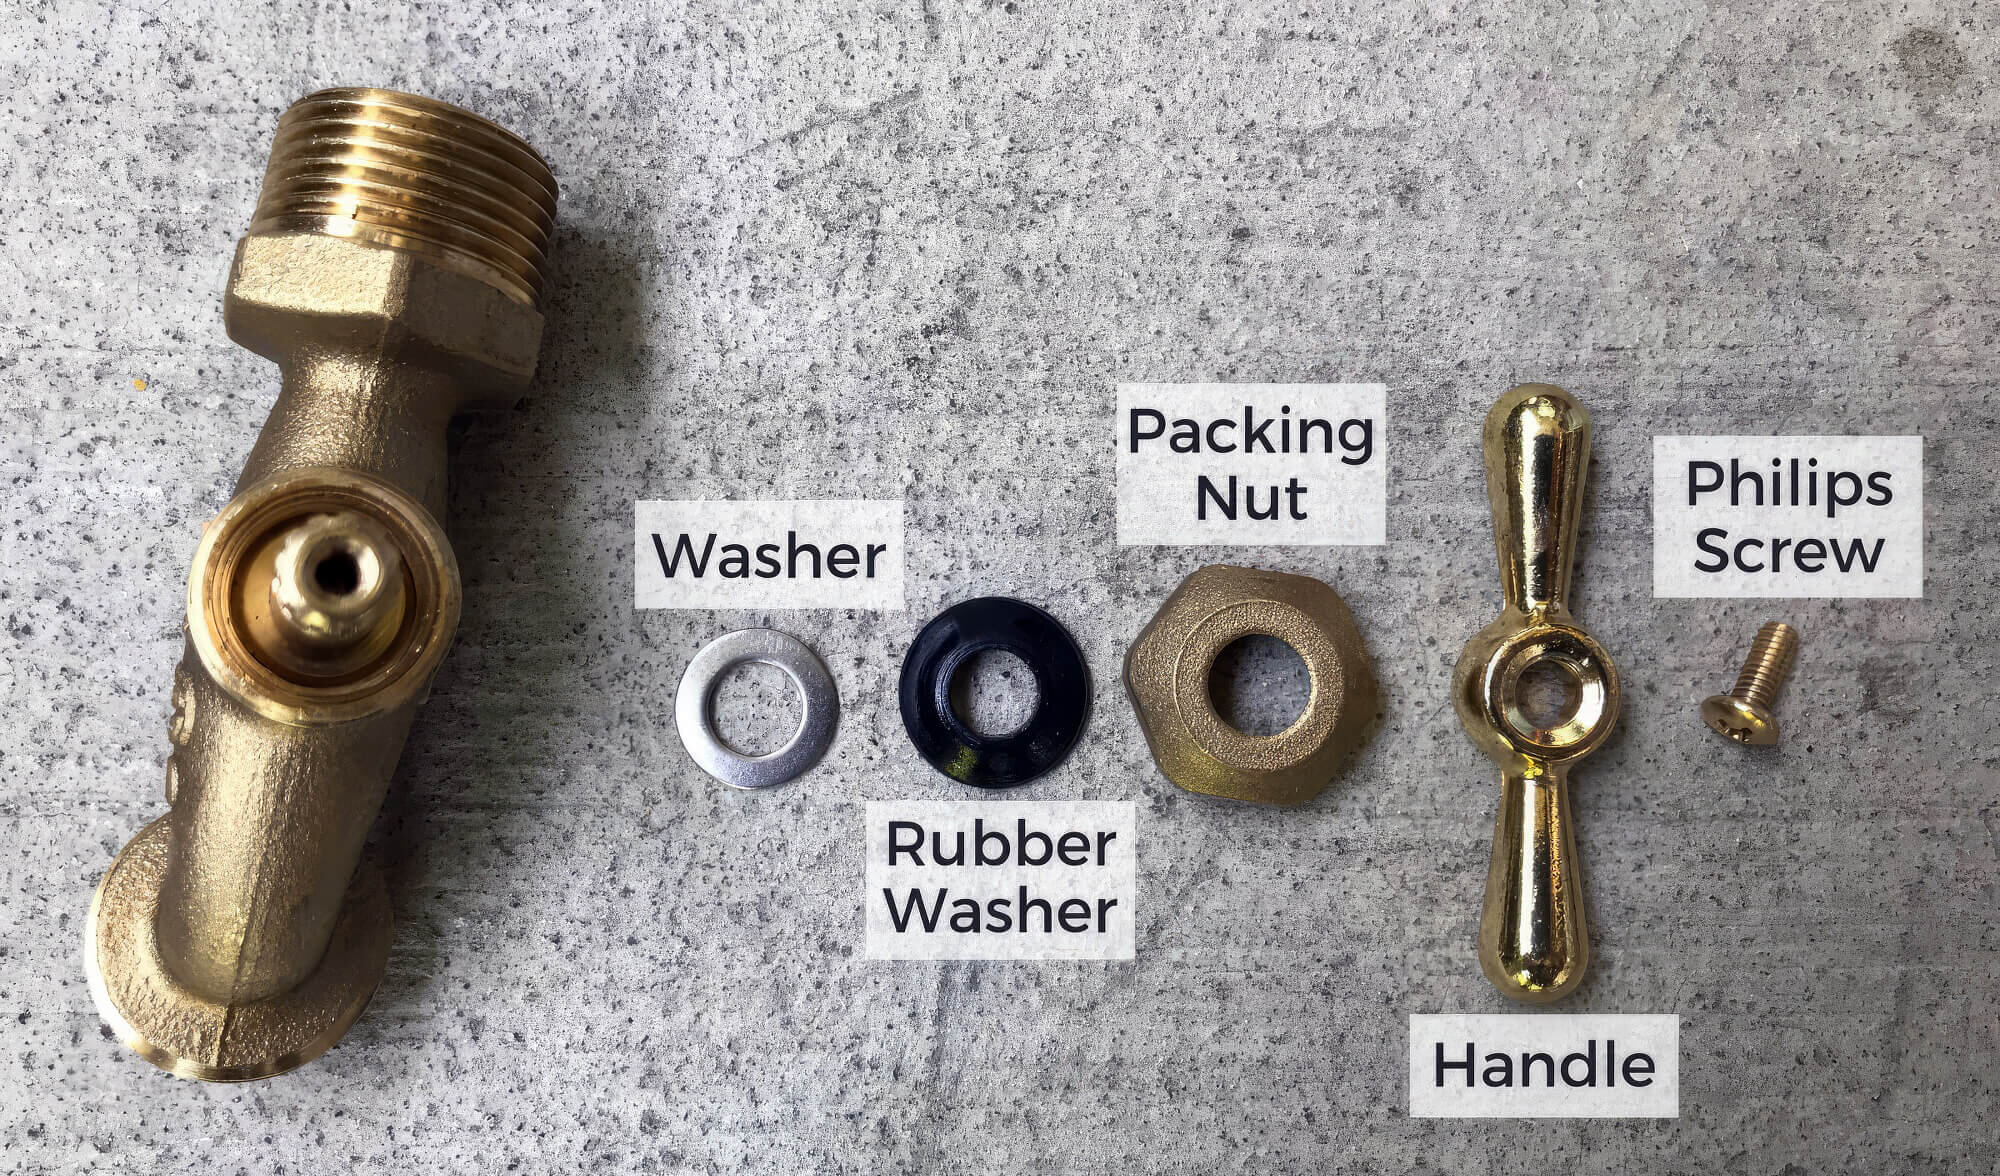
2. Remove the Tap Handle
- Use a screwdriver to remove the screw securing the handle.
- Carefully pull the handle off to expose the valve mechanism.
3. Unscrew the Tap Head
- Use an adjustable wrench to loosen the packing nut or tap head.
- Remove the tap head to access the washer and valve seat.
4. Inspect and Replace the Washer
- Examine the rubber washer at the base of the valve spindle.
- If it’s worn, cracked, or hardened, replace it with a new one of the same size.
- Washers are often the main cause of leaks.
5. Check and Replace O-Rings (If Applicable)
- Inspect the O-rings around the valve stem.
- Replace any damaged or brittle O-rings to restore a proper seal.
6. Examine the Valve Seat
- Look inside the tap body at the valve seat.
- If it’s corroded or damaged, use a valve seat wrench or screwdriver to remove it.
- Replace with a new valve seat or repair minor damage using a valve seat grinder.
7. Reassemble the Tap
- Wrap PTFE tape around the valve spindle threads to enhance sealing.
- Reinsert the valve spindle into the tap body.
- Tighten the packing nut securely but avoid overtightening.
- Reattach the tap handle and secure the screw.
8. Turn the Water Back On and Test
- Slowly open the main water supply.
- Turn on the garden tap and check for leaks.
- If the leak persists, recheck your work or consider consulting a plumber.
Additional Tips to Prevent Future Leaks
- Regular maintenance: Inspect your garden taps seasonally and replace washers proactively.
- Protect taps in winter: Use tap covers or insulation to prevent freezing and cracking.
- Install pressure reducers: If water pressure is consistently high, install a pressure regulator.
- Use quality parts: Invest in durable washers and seals to extend tap life.
When to Call a Professional
While many leaks can be fixed with basic DIY skills, professional help is advisable if:
- The tap body or pipe is cracked or severely corroded.
- You cannot identify the leak source or it persists after repairs.
- You are uncomfortable working with plumbing fixtures.
A licensed plumber can perform advanced repairs or replacements safely and efficiently.
Conclusion
Fixing a leaky garden tap is a manageable DIY task that can save water, reduce bills, and extend the life of your outdoor plumbing. By understanding the common causes and following the step-by-step repair guide, you can quickly stop those drips and keep your garden tap in excellent working order.
Remember, timely maintenance and using quality replacement parts are key to preventing future leaks. If you encounter persistent issues or damage beyond washers and O-rings, don’t hesitate to seek professional plumbing assistance. With these tips, you’ll enjoy a drip-free garden tap and contribute to conserving water—one drop at a time.
Quick Recap: How to Fix Leaky Garden Tap
| Step | Action |
|————————–|—————————————|
| 1. Turn off water supply | Prevent water flow before starting |
| 2. Remove handle | Access internal components |
| 3. Unscrew tap head | Expose valve mechanism |
| 4. Replace washer | Fix worn or damaged washers |
| 5. Replace O-rings | Ensure tight seal around valve stem |
| 6. Repair/replace valve seat | Address corrosion or damage |
| 7. Reassemble and test | Check for leaks after reassembly |
By following this guide, you’ll master how to fix your leaky garden tap efficiently and effectively!
