Introduction
Are you tired of your garden tub’s dull or outdated appearance? Instead of replacing the entire fixture, you might wonder, can you paint a garden tub? The answer is yes! Painting a garden tub is a practical and cost-effective way to give your bathroom a fresh, new look without the hassle and expense of a full remodel.
In this comprehensive guide, we’ll explore everything you need to know about painting your garden tub. From the best types of paint to choose, surface preparation tips, and step-by-step instructions, to safety precautions and maintenance advice — this article covers it all. Whether your garden tub is made of acrylic, fiberglass, or porcelain, painting can extend its life and enhance your bathroom’s aesthetic appeal.
By the end, you’ll have expert insights and clear guidance to confidently transform your garden tub and create a spa-like retreat right at home.
What Is a Garden Tub and Why Paint It?
What Is a Garden Tub?
A garden tub is a large, often oval-shaped bathtub designed for deep soaking and relaxation. Unlike standard bathtubs, garden tubs are usually wider and deeper, sometimes featuring whirlpool jets. They are popular in master bathrooms and add a luxurious feel to the space.
Why Consider Painting a Garden Tub?
- Cost Savings: Replacing a garden tub can cost thousands of dollars, while painting is a fraction of that price.
- Restoration: Paint can cover chips, stains, or discoloration, restoring the tub’s appearance.
- Customization: You can update the color to match your bathroom decor or create a unique look.
- Extended Lifespan: A fresh paint layer can protect the tub’s surface from wear and tear.
Can You Paint a Garden Tub? The Basics
Yes, you can paint most garden tubs, but success depends on the tub material and the type of paint used. Common garden tub materials include:
- Acrylic: Lightweight, durable, and easy to refinish.
- Fiberglass: Affordable and common, but porous and requires proper priming.
- Porcelain-Enameled Steel or Cast Iron: Very durable but requires special paint designed for porcelain surfaces.
Important Considerations Before Painting:
- Surface Condition: The tub should be free of cracks, chips, or severe damage.
- Proper Cleaning: Remove soap scum, oils, and grime for paint adhesion.
- Ventilation: Painting materials can emit strong fumes; ensure good airflow.
- Durability Needs: A bathroom tub requires waterproof, chip-resistant paint.
Best Paint Types for Garden Tubs
Choosing the right paint is critical. Here are the most effective options:
1. Epoxy Paint
- Why Use It: Epoxy paint is highly durable, chemical-resistant, and waterproof.
- Best For: Acrylic and fiberglass tubs.
- Application: Usually a two-part system requiring mixing before use.
- Finish: Glossy, smooth, and professional-looking.
2. Acrylic Urethane Paint
- Why Use It: Offers flexibility and resistance to cracking.
- Best For: Fiberglass and acrylic tubs.
- Finish: Semi-gloss to high gloss.
3. Porcelain and Ceramic Tub Paints
- Why Use It: Specifically formulated for porcelain and enamel surfaces.
- Best For: Porcelain-enameled steel or cast iron tubs.
- Finish: Hard, glossy finish that mimics factory coating.
Avoid:
- Standard Latex or Interior Wall Paints: These will not withstand water exposure or chemicals.
- Spray Paints Not Made for Bathrooms: They lack durability and water resistance.
Step-by-Step Guide to Painting Your Garden Tub
What You’ll Need:
- Epoxy or specialized tub paint
- Fine-grit sandpaper (220-400 grit)
- Cleaning supplies (non-abrasive cleaner, isopropyl alcohol)
- Painter’s tape and plastic sheeting
- Paintbrushes and/or rollers (foam rollers recommended)
- Respirator mask and gloves
- Primer (if required by paint manufacturer)
Step 1: Prepare the Area
- Remove faucets, drain covers, and any hardware.
- Cover surrounding surfaces with plastic sheeting.
- Ensure adequate ventilation by opening windows or using fans.
Step 2: Clean the Tub Thoroughly
- Use a non-abrasive cleaner to remove soap scum and oils.
- Rinse and wipe dry.
- Wipe the surface with isopropyl alcohol to remove residue.
Step 3: Sand the Surface
- Lightly sand the tub to create a rough texture for paint adhesion.
- Focus on glossy areas and any imperfections.
- Wipe away dust with a damp cloth and let dry.
Step 4: Apply Primer (If Needed)
- Some paints require a primer to adhere properly.
- Apply primer evenly and let it dry according to manufacturer instructions.
Step 5: Paint the Tub
- Stir the paint thoroughly.
- Use a foam roller or brush to apply thin, even coats.
- Allow each coat to dry fully before applying the next.
- Most projects require 2-3 coats.
Step 6: Cure Time
- Allow the paint to cure completely—usually 24 to 72 hours.
- Avoid water exposure during this time to ensure durability.
Step 7: Reinstall Hardware and Enjoy
- Replace drains, faucets, and accessories.
- Clean the tub gently and avoid abrasive cleaners.
Tips for a Long-Lasting Painted Garden Tub
- Avoid Harsh Cleaners: Use mild, non-abrasive cleaners to prevent paint damage.
- Use a Bath Mat: Prevent scratches from heavy or sharp objects.
- Touch Up Promptly: Fix any chips or scratches as soon as they appear.
- Maintain Proper Ventilation: Reduce moisture buildup to prolong paint life.
Common Questions About Painting Garden Tubs
Does Painting a Garden Tub Affect Its Waterproofing?
When done correctly with the right paint, the tub remains waterproof. Epoxy and urethane paints are designed to create a water-resistant barrier.
How Much Does It Cost to Paint a Garden Tub?
Painting a garden tub typically costs between $100 and $300 for DIY projects, depending on paint quality and supplies. Professional services can run $300 to $700.
How Long Does Painted Tub Finish Last?
With proper preparation and maintenance, a painted tub finish can last 5 to 10 years.
Can You Change the Color of a White Garden Tub?
Yes, painting allows you to change the tub’s color to virtually any shade, offering design flexibility.
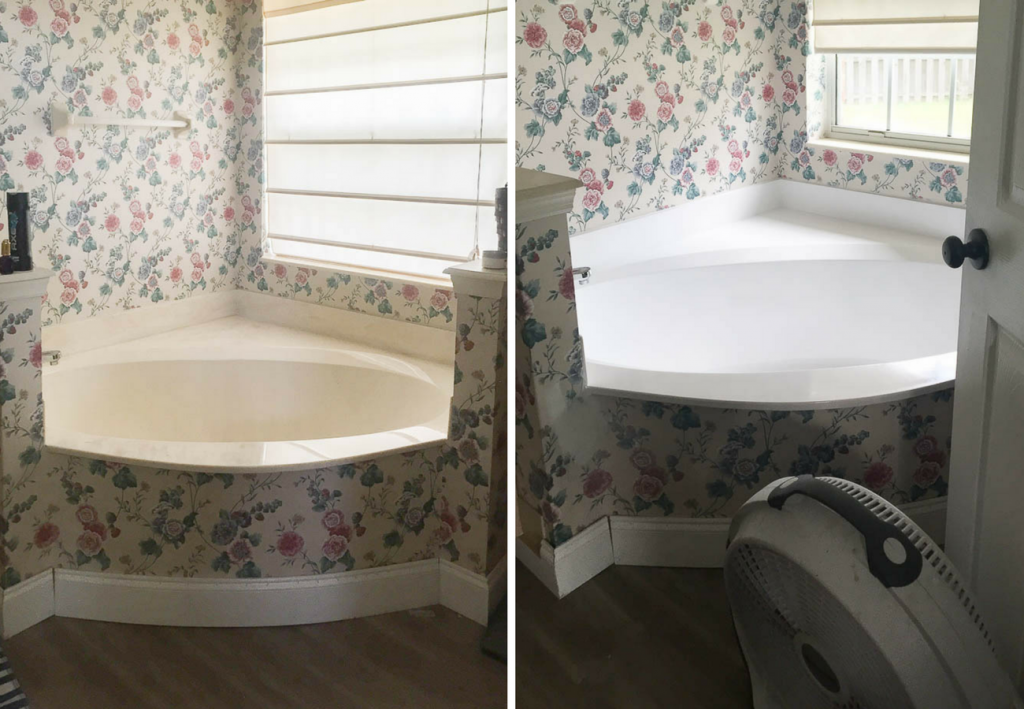
Real-World Example: A Bathroom Makeover with a Painted Garden Tub
Marie, a homeowner in Seattle, wanted to update her outdated beige garden tub. Instead of costly replacement, she opted to paint it deep navy blue using epoxy paint. After thorough cleaning and sanding, she applied three coats over two days. The result was a stunning tub that complemented her modern bathroom theme. Marie saved over $2,000 and transformed her space with minimal downtime.
Conclusion
Painting a garden tub is a smart, affordable way to breathe new life into your bathroom. With the right preparation, paint choice, and application techniques, you can achieve a durable, beautiful finish that rivals brand-new tubs. Whether you want to restore an old acrylic tub, cover stains on fiberglass, or refresh a porcelain surface, painting offers a practical solution that fits various budgets and styles.
Before you start, consider the tub’s material, choose specialized paint, and follow detailed steps for surface prep and painting. Remember, patience during curing and gentle maintenance after painting will keep your garden tub looking flawless for years.
Ready to give your garden tub a makeover? Gather your supplies, prepare your space, and enjoy the transformation of your bathroom oasis!
Call to Action:
If you found this guide helpful, share your garden tub painting experience or questions in the comments below. For more home improvement tips and expert advice, subscribe to our newsletter!
