Removing a stuck garden hose can be a frustrating experience for any gardener or homeowner. Whether it’s due to rust, dirt buildup, or a tight connection, a hose that won’t budge can slow down your outdoor tasks and even cause damage if not handled properly. Understanding how to remove a stuck garden hose safely and efficiently is essential to maintaining your garden tools and saving time.
In this article, we’ll explore practical, expert-approved methods to free your stuck garden hose. You’ll learn why hoses get stuck, the tools you need, and step-by-step instructions to loosen and detach your hose without causing damage. Whether you’re dealing with a garden hose attached to a faucet, sprinkler, or nozzle, these proven techniques will help you get the job done quickly and safely.
Why Does a Garden Hose Get Stuck?
Before diving into removal techniques, it’s important to understand the common reasons a garden hose becomes stuck:
- Corrosion and Rust: Metal connectors exposed to water and air can rust, causing the hose fittings to seize.
- Dirt and Debris Buildup: Soil, sand, or mineral deposits can accumulate in the hose threads, making unscrewing difficult.
- Over-tightening: Excessive force when attaching the hose can damage or deform connections.
- Wear and Tear: Old hoses or fittings may warp or deform, making removal tricky.
Recognizing these causes helps you choose the most effective removal method and prevents future issues.
Essential Tools for Removing a Stuck Garden Hose
Before you begin, gather the following tools to ensure a smooth and safe process:
- Adjustable wrench or pliers: For extra grip and leverage.
- Penetrating oil (like WD-40): Helps loosen rusted or corroded threads.
- Heat source (hairdryer or heat gun): Expands metal parts to break the bond.
- Rubber gloves: Protect your hands and provide better grip.
- Cloth or rag: To clean the connectors.
- Lubricant or silicone spray: For smoother future connections.
Having these tools ready will streamline your efforts and reduce the risk of damage.
Step-by-Step Guide: How to Remove a Stuck Garden Hose
Step 1: Turn Off the Water Supply
Always begin by turning off the water supply to the hose. This prevents water from spraying out when you disconnect the hose and allows you to work safely.
Step 2: Clean the Hose Connection Area
Use a cloth to wipe away dirt, mud, or debris around the hose connection. This clears the threads and helps penetrating oil reach the stuck areas.
Step 3: Apply Penetrating Oil
Spray a generous amount of penetrating oil onto the hose fitting and faucet threads. Let it sit for 10-15 minutes to soak in and loosen rust or buildup.
Step 4: Use Heat to Expand the Metal (Optional)
If the hose remains stuck after the oil treatment, gently heat the metal connector using a hairdryer or heat gun for 1-2 minutes. Heat causes metal to expand slightly, which can free stuck threads.
Important: Avoid using open flames or excessive heat to prevent damage.
Step 5: Attempt to Unscrew the Hose by Hand
After the oil and heat treatment, try to unscrew the hose by hand. Wearing rubber gloves can improve your grip and protect your hands.
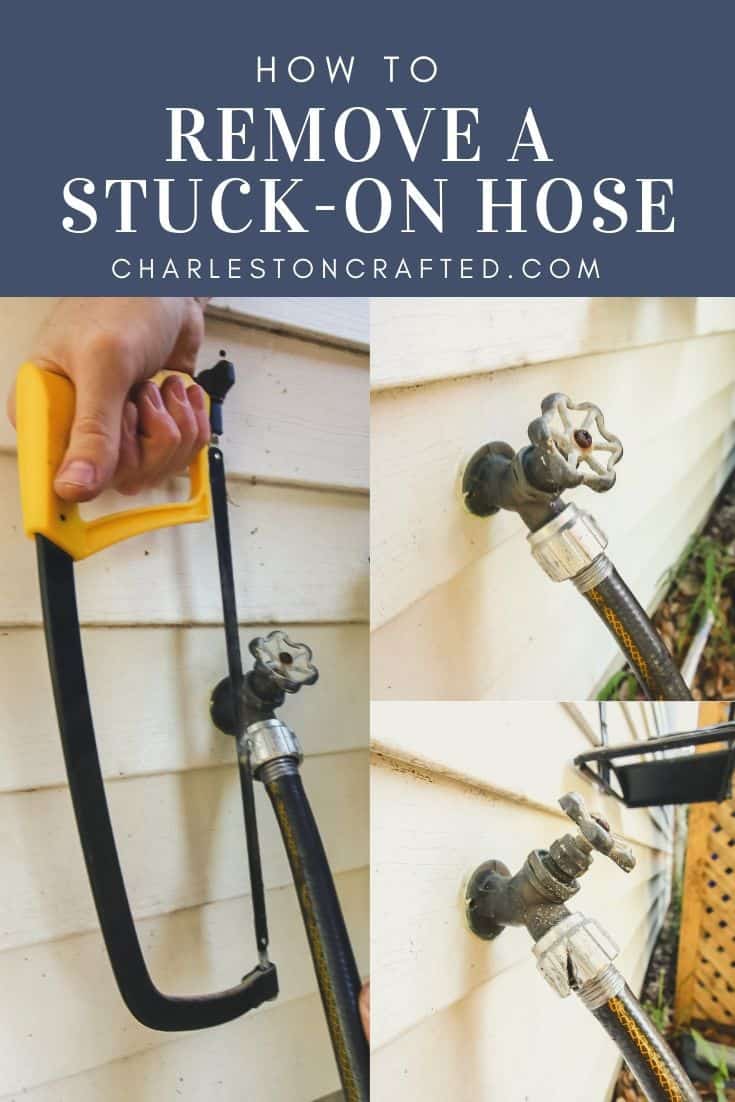
Step 6: Use an Adjustable Wrench or Pliers
If hand loosening fails, carefully use an adjustable wrench or pliers to grip the hose connector. Turn counterclockwise with steady, controlled pressure.
- Tip: Place a cloth between the tool and the hose fitting to avoid scratching or damaging the metal.
Step 7: Repeat if Necessary
If the hose still won’t budge, repeat the penetrating oil application and heating steps. Patience is key to avoid damaging the hose or faucet.
Preventing Future Hose Sticking
To avoid dealing with stuck hoses in the future, follow these best practices:
- Regular Maintenance: Clean hose threads and faucet connections regularly.
- Use Lubricants: Apply silicone spray or plumber’s grease to threads before attaching the hose.
- Avoid Over-tightening: Secure the hose snugly but don’t force it excessively.
- Store Properly: Drain hoses after use and store them in a dry place to prevent corrosion.
- Upgrade to Quality Fittings: Consider hoses and connectors with corrosion-resistant materials like brass or stainless steel.
Expert Tips and Common Mistakes to Avoid
- Don’t Force Excessively: Forcing the hose can strip threads or crack fittings.
- Avoid Metal-on-Metal Damage: Use protective cloths when applying wrenches.
- Check for Valve Type: Some faucets have built-in backflow preventers or quick-connect fittings that require special removal techniques.
- Use the Right Tools: Avoid using pliers with serrated jaws directly on hose fittings, which can cause damage.
FAQs About Removing a Stuck Garden Hose
Q1: Can I use a hammer to loosen a stuck hose?
A: It’s not recommended to hit hose fittings with a hammer as it can damage threads or connectors.
Q2: How long should I wait after applying penetrating oil?
A: Waiting 10-15 minutes is usually sufficient. For severe rust, you may leave it longer or reapply.
Q3: Is it safe to use boiling water to loosen a hose?
A: Boiling water can help but risks damaging plastic parts. Use caution and prefer gentle heat sources.
Conclusion
Removing a stuck garden hose doesn’t have to be a stressful or damaging task. By understanding why hoses get stuck and following a systematic approach—using penetrating oil, gentle heat, and proper tools—you can free your hose safely and efficiently. Regular maintenance and careful handling will prevent future sticking, saving you time and frustration.
Next time you face a stubborn hose connection, use these expert tips to solve the problem confidently. Remember, patience and the right technique are your best tools for maintaining a smooth-flowing garden hose system.
Ready to tackle your stuck garden hose? Gather your tools, follow these steps, and get back to enjoying your garden hassle-free!
