A broken garden hose can disrupt your gardening routine and waste water if not fixed promptly. Whether it has a small leak, a crack, or a burst section, repairing your garden hose yourself saves money and extends the life of your equipment. In this guide, you’ll learn how to repair a broken garden hose efficiently using simple tools and materials. We’ll cover common types of damage, detailed repair methods, and tips to prevent future issues.
Garden hoses are essential for watering plants, washing vehicles, and outdoor cleaning. Knowing how to fix leaks and breaks quickly means less downtime and water waste. This article will walk you through easy-to-follow repairs, from patching holes to replacing damaged hose segments. By the end, you’ll be confident in maintaining your garden hose and avoiding costly replacements.
Common Causes of Garden Hose Damage
Understanding why hoses break helps you take preventive measures. Here are frequent causes:
- Aging and Sun Exposure: Prolonged UV exposure weakens hose material, causing cracks.
- Physical Damage: Stepping on hoses or dragging them across rough surfaces can cause punctures or splits.
- Freezing Temperatures: Water inside hoses can freeze and expand, leading to bursts.
- Improper Storage: Kinking or twisting hoses while stored creates weak points.
How to Identify the Type of Hose Damage
Before repairing, determine the damage type:
- Small Leak or Pinholes: Tiny water sprays or drips along the hose.
- Cracks or Splits: Visible rips in the hose surface.
- Burst Sections: Larger holes or completely torn areas.
- Damaged Fittings: Loose or broken connectors at hose ends.
Step-by-Step Guide: How to Repair a Broken Garden Hose
1. Repairing Small Leaks and Pinholes
Small leaks are the easiest to fix and usually occur due to minor punctures.
Materials Needed:
– Waterproof tape (self-fusing silicone tape preferred)
– Hose repair patch or rubber patch
– Scissors
Instructions:
1. Turn off water supply and drain the hose completely.
2. Dry the damaged area thoroughly.
3. Apply a patch over the leak or wrap the area tightly with waterproof tape.
4. For extra durability, use self-fusing silicone tape that bonds without adhesive.
5. Allow the repair to cure for a few hours before testing.
Tip: Avoid using duct tape for long-term repairs as it loses adhesion when wet.
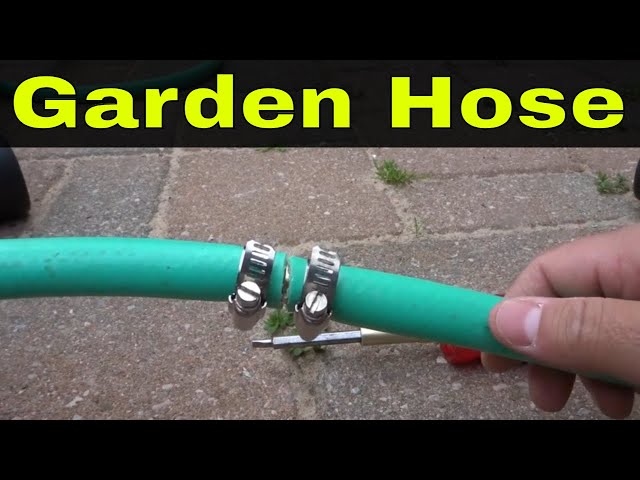
2. Fixing Cracks or Splits with Hose Repair Kits
For larger cracks, hose repair kits provide connectors to replace damaged sections.
Materials Needed:
– Hose repair kit (includes couplings/connectors)
– Sharp utility knife
– Screwdriver or pliers
Instructions:
1. Cut out the damaged section using a sharp knife, making clean straight cuts.
2. Insert the hose ends into the coupling from the kit.
3. Tighten clamps on both sides securely.
4. Test the repair by turning on water flow and checking for leaks.
Note: Hose repair kits work well for burst sections too.
3. Replacing Damaged Hose Ends or Fittings
Sometimes the problem lies in the connectors rather than the hose.
Materials Needed:
– Replacement hose fitting
– Hose clamp
– Utility knife or scissors
Instructions:
1. Cut off the damaged fitting cleanly.
2. Insert the new fitting into the hose end.
3. Secure it tightly with a hose clamp.
4. Test water flow for leaks.
Preventive Tips to Avoid Future Hose Damage
Maintaining your hose properly reduces breaks:
- Store hoses indoors or in shaded areas during winter.
- Drain water completely before storage to avoid freezing damage.
- Use hose reels to prevent kinks and tangles.
- Avoid dragging hoses over sharp or rough surfaces.
- Regularly inspect hoses for early signs of wear.
Expert Insights on Garden Hose Repair
According to gardening expert Lisa Martin, “Regular inspection and prompt repair of small leaks not only saves water but also prolongs the life of your garden hose significantly.” She recommends using high-quality silicone repair tapes for waterproof and flexible fixes.
Frequently Asked Questions (FAQs)
Q1: Can I use duct tape to fix my garden hose?
Duct tape may work temporarily but is not waterproof or durable enough for long-term hose repairs.
Q2: How long does a hose repair last?
With proper materials and technique, repairs can last for months or even years.
Q3: Is it better to repair or replace a garden hose?
Minor leaks and cracks can be repaired easily. However, if your hose has multiple damaged spots or is very old, replacement might be more cost-effective.
Conclusion
Repairing a broken garden hose is simple and cost-effective when you know the right steps. From patching small leaks with waterproof tape to replacing damaged sections with repair kits, these fixes save money and reduce water waste. Regular maintenance and proper storage also extend your hose’s lifespan. Next time you spot a leak or crack, you’ll be ready to tackle the repair confidently and keep your garden thriving.
Take action today: Inspect your garden hose for any signs of damage and apply these repair tips to ensure efficient watering all season long!
By following this guide, you’re not only fixing your garden hose—you’re practicing sustainable gardening with smart water management.
