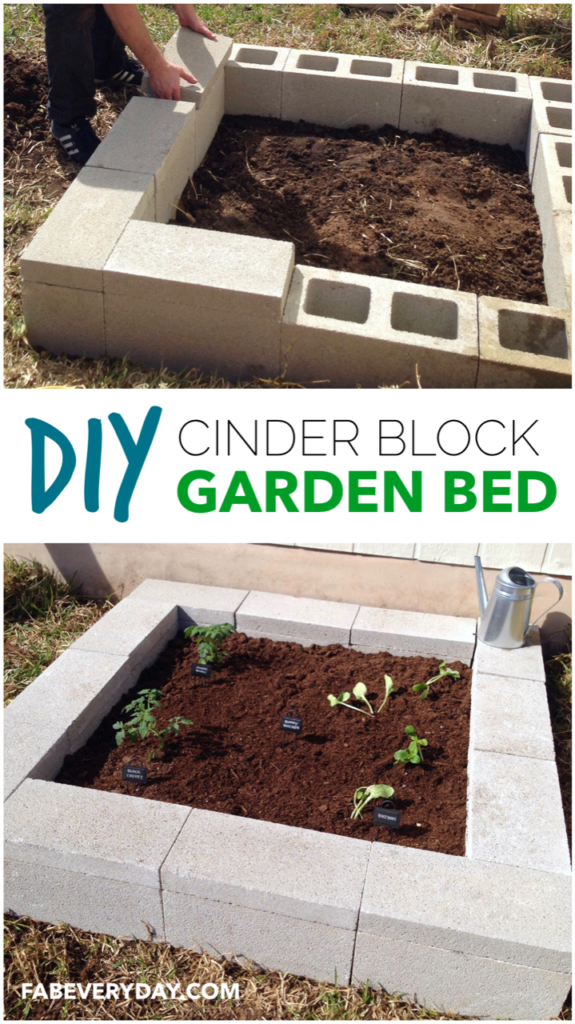
Raised garden beds have become increasingly popular among gardeners of all levels, offering control over soil quality, improved drainage, and easier access for planting and harvesting. Using cinder blocks to build these beds provides a durable, affordable, and versatile option that can last for years. This guide will walk you through how to make raised garden beds with cinder blocks, covering everything from planning and materials to construction and planting tips.
Whether you’re a beginner or an experienced gardener, this article will equip you with the knowledge and confidence to build an effective, attractive raised bed tailored to your garden space.
Why Choose Cinder Blocks for Raised Garden Beds?
Before diving into the construction process, it’s important to understand the benefits of using cinder blocks:
- Durability: Cinder blocks are strong and weather-resistant, providing a sturdy frame that withstands the elements.
- Affordability: Compared to wood or stone, cinder blocks are cost-effective and often readily available.
- Versatility: You can easily customize the size and shape of your garden bed by arranging blocks in various configurations.
- Pest Resistance: Unlike wood, cinder blocks don’t attract termites or other pests.
- Built-in Planters: The hollow cavities in cinder blocks can be filled with soil or plants, adding extra growing space or visual interest.
What You Need: Tools and Materials
To build your raised garden bed with cinder blocks, gather the following:
Materials:
- Cinder blocks (standard size: 16″ x 8″ x 8″)
- Quality garden soil or a soil mix (compost, topsoil, and organic matter)
- Landscape fabric (optional, for weed control)
- Gravel or small stones (for drainage)
- Plants or seeds of your choice
Tools:
- Shovel or spade
- Level
- Tape measure
- Garden gloves
- Rubber mallet or hammer (optional, for leveling blocks)
- Trowel or small hand tool for planting
How to Make Raised Garden Beds With Cinder Blocks: Step-by-Step Instructions
Step 1: Choose and Prepare Your Location
Select a sunny spot with good drainage. Most vegetables and flowers need at least 6 hours of direct sunlight daily.
- Clear the area of grass, weeds, and debris.
- Level the ground where you’ll place the blocks to ensure stability.
- Consider laying down landscape fabric to prevent weed growth beneath the bed.
Step 2: Plan Your Bed Dimensions and Layout
Common raised bed sizes with cinder blocks are:
- 4 feet by 8 feet (standard garden bed size)
- 4 feet by 4 feet (for smaller spaces)
Since each cinder block is 16 inches long, plan your bed dimensions in multiples of 16 inches for a snug fit.
Step 3: Lay the First Course of Blocks
- Arrange the blocks in your desired shape (rectangle or square).
- Use a level to ensure blocks are even and stable.
- If necessary, use a rubber mallet to gently tap blocks into place.
Step 4: Stack Additional Layers
- For a higher raised bed, stack a second or third layer of blocks.
- Offset the blocks in each new layer to create a running bond pattern (like bricks). This adds strength.
- Ensure each layer is level before stacking the next.
Step 5: Fill the Hollow Cavities (Optional)
- Fill the hollow spaces of the blocks with soil, gravel, or decorative plants such as succulents or herbs.
- This enhances insulation and adds aesthetic appeal.
Step 6: Prepare the Bed Interior
- Add a layer of gravel or small stones at the bottom for drainage.
- Fill the bed with a rich soil mix suitable for your plants.
- Mix compost into the soil to improve fertility and structure.
Step 7: Plant Your Garden
- Choose plants based on your climate and garden goals.
- Follow planting instructions for spacing and depth.
- Water the bed thoroughly after planting.
Tips for Success With Cinder Block Raised Beds
- Consider adding a moisture barrier inside the blocks if you’re concerned about chemicals leaching. Food-grade liners can be used.
- Paint or seal the blocks if you want a more polished look or extra weather protection.
- Use drip irrigation or soaker hoses for efficient watering.
- Add mulch on top of the soil to retain moisture and reduce weeds.
- Regularly test soil pH to maintain optimal growing conditions.
Real-World Examples and Case Studies
- Urban Gardener’s Success: In a community garden in Seattle, gardeners built cinder block beds that withstood heavy rains without erosion, increasing yield by 30% over traditional in-ground plots.
- DIY Enthusiast Review: A DIY blogger successfully built a 3-layer cinder block raised bed in her backyard, noting the ease of construction and low maintenance.
Common Questions About Cinder Block Raised Beds
Are cinder blocks safe for growing vegetables?
Yes. Modern cinder blocks are generally safe for vegetable gardening. However, if concerned, you can use a food-safe liner inside the blocks.
How tall should a raised bed be?
Typically, 12 to 24 inches is ideal for most vegetables. Cinder blocks stacked two to three layers high reach this range.
Can I move the cinder block raised bed later?
Cinder block beds are semi-permanent due to their weight. They can be disassembled but are not as portable as wooden beds.
Conclusion
Building raised garden beds with cinder blocks is a practical, affordable, and durable way to enhance your gardening experience. These beds improve soil conditions, provide better drainage, and can be customized to fit your space perfectly. By following the steps outlined above, you can create a beautiful and productive garden bed that will serve you for years.
Ready to start your garden transformation? Gather your materials, plan your layout, and enjoy the rewarding process of growing your own plants in sturdy, long-lasting cinder block raised beds. Happy gardening!
Remember: The key to success lies in careful planning, quality soil, and consistent care. Your cinder block raised garden bed is not just a garden structure—it’s a foundation for growth and sustainability.
