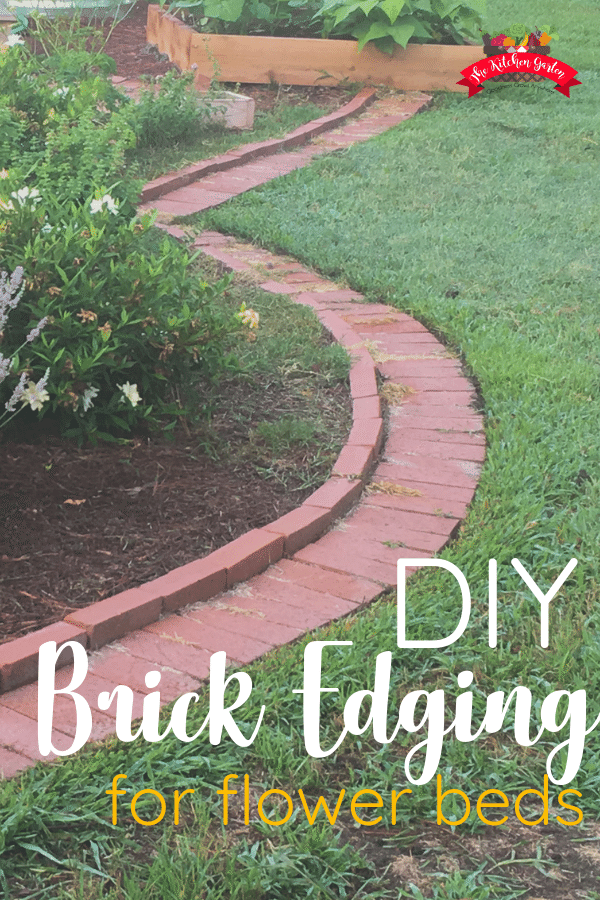
Creating clean, defined edges around your garden beds not only enhances the beauty of your outdoor space but also helps contain soil and mulch effectively. Brick edging is a classic, durable, and visually appealing choice that can elevate your garden’s look. If you’re wondering how to lay brick edging for garden beds, this comprehensive guide will walk you through the entire process—from planning to installation—with expert tips and practical advice.
Why Choose Brick Edging for Garden Beds?
Brick edging offers several advantages:
- Durability: Bricks withstand weather changes and heavy foot traffic.
- Aesthetic Appeal: Their timeless look complements various garden styles.
- Functionality: Keeps mulch and soil in place, preventing spread onto walkways.
- Low Maintenance: Requires minimal upkeep once installed correctly.
With these benefits, brick edging is a smart investment for both novice and experienced gardeners.
Materials and Tools Needed for Brick Edging
Before starting, gather the following items:
- Materials:
- Standard or decorative bricks (quantity depends on bed size)
- Sand or gravel (for base layer)
- Mortar or landscape adhesive (optional for a permanent edge)
-
Landscape fabric (optional, to prevent weed growth)
-
Tools:
- Tape measure
- Garden hose or string (to mark edges)
- Shovel or spade
- Level
- Rubber mallet
- Wheelbarrow (for mixing mortar or moving soil)
- Trowel (if using mortar)
- Broom (for finishing)
Step-by-Step Process: How to Lay Brick Edging for Garden Beds
1. Plan and Mark Your Edging Line
- Use a garden hose or string to outline the desired shape of your garden bed.
- Measure the length to estimate the number of bricks required.
- Double-check the design for smooth curves or straight lines based on your preference.
2. Excavate the Trench
- Dig a trench along the marked line about 4 to 6 inches deep and slightly wider than a brick (usually 4 to 6 inches).
- Remove roots, rocks, and debris to create a clean base.
3. Prepare the Base
- Add a 2 to 3-inch layer of compacted sand or gravel in the trench.
- Level and compact the base using a tamper or your foot to create a sturdy foundation for the bricks.
4. Lay the First Brick Row
- Place the first brick at one end of the trench.
- Use a level to ensure the brick is flat and even.
- Continue placing bricks along the trench, tapping each one gently with a rubber mallet to set it.
- Check for levelness frequently to maintain a uniform edge.
5. Secure the Bricks (Optional)
- For a permanent installation, apply a thin layer of mortar or landscape adhesive between bricks.
- Use a trowel to spread mortar evenly.
- Smooth out excess mortar and clean bricks with a damp sponge.
6. Backfill and Stabilize
- Once all bricks are in place, backfill the trench with soil or sand around the bricks to hold them firmly.
- Tamp the soil gently to avoid shifting.
7. Final Touches
- Sweep off any sand or mortar residue from the brick surface.
- Optionally, lay landscape fabric under mulch to reduce weed growth.
- Add mulch or soil inside the bed for a finished look.
Expert Tips for Perfect Brick Edging
- Choose bricks designed for landscaping; they withstand soil moisture better.
- For curved beds, use flexible bricks or break bricks carefully to fit the curve.
- Use a string line and stakes for straight edges to maintain alignment.
- Apply sealant on bricks for extra protection against moisture.
- Maintain a consistent gap (about 1/8 inch) between bricks for mortar or adhesive.
Common Questions About Brick Edging
How long does brick edging last?
With proper installation and maintenance, brick edging can last 20 years or more due to its durability and resistance to weather.
Can I lay brick edging without mortar?
Yes, for a temporary or flexible edge, bricks can be laid directly on a compacted base without mortar. However, mortar provides extra stability.
What size bricks are best for garden edging?
Standard bricks measuring approximately 8 inches by 4 inches by 2.25 inches work well. You can use half bricks or decorative bricks for curves or patterns.
Conclusion
Laying brick edging for garden beds is a rewarding DIY project that adds structure and elegance to your garden. By following the step-by-step guide, you ensure a durable, neat border that enhances both functionality and curb appeal. Remember, proper planning, base preparation, and attention to detail are key to a successful installation.
Whether you prefer a classic straight edge or a flowing curved design, brick edging offers timeless charm and practicality. Ready to transform your garden beds? Gather your materials and start laying your bricks today—your garden deserves that polished finishing touch!
Take Action: Share your garden edging project or ask questions in the comments below. For more gardening tips and expert advice, subscribe to our newsletter and stay inspired!
