Installing a mesh garden fence is a practical and cost-effective way to protect your garden from pests, animals, and intruders. Whether you want to keep rabbits out, support climbing plants, or add a neat boundary to your yard, a mesh fence offers versatility and durability. This guide will walk you through the entire installation process, helping you achieve a professional result even if you’re new to fencing.
In this article, you’ll learn the essential tools and materials required, step-by-step instructions for installing your mesh fence, and tips to ensure your fence stands strong for years. We’ll also cover common challenges and how to troubleshoot them. By the end, you’ll have all the knowledge needed to confidently install a mesh garden fence that complements and protects your outdoor space.
Why Choose a Mesh Garden Fence?
Before diving into installation, it’s useful to understand why mesh fencing is a popular choice:
- Durable and Weather-Resistant: Mesh fences made from galvanized steel or PVC-coated wire resist rust and wear.
- Affordable and Easy to Install: Compared to solid fences, mesh fencing requires fewer materials and less labor.
- Versatile Use: Ideal for protecting vegetable patches, creating pet enclosures, or supporting climbing plants.
- Good Visibility: Allows sunlight and air to pass through, ensuring your plants thrive.
Now, let’s explore the detailed steps to install your mesh garden fence effectively.
What You Need Before Installing a Mesh Garden Fence
Gathering the right tools and materials will save time and make the project smoother.
Tools and Materials Checklist:
- Mesh fencing roll (galvanized or PVC-coated)
- Fence posts (wooden or metal, depending on preference)
- Post hole digger or auger
- Hammer or mallet
- Staples or fencing clips
- Wire cutters
- Measuring tape
- Level
- String line and stakes
- Shovel
- Gloves and safety glasses
Step-by-Step Guide: How to Install Mesh Garden Fence
Step 1: Plan and Measure Your Fence Line
- Outline the perimeter of your garden using stakes and string to mark the fence line.
- Measure the total length to determine how much mesh fencing and how many posts you will need.
- Plan the spacing of fence posts, typically 6 to 8 feet apart, to ensure stability.
Step 2: Prepare the Fence Posts
- Use a post hole digger or auger to dig holes about 12-18 inches deep for each post.
- Place the posts into the holes, ensuring they are vertical using a level.
- Fill the holes with soil or concrete mix for added stability.
- Allow concrete to set if used, usually 24 hours.
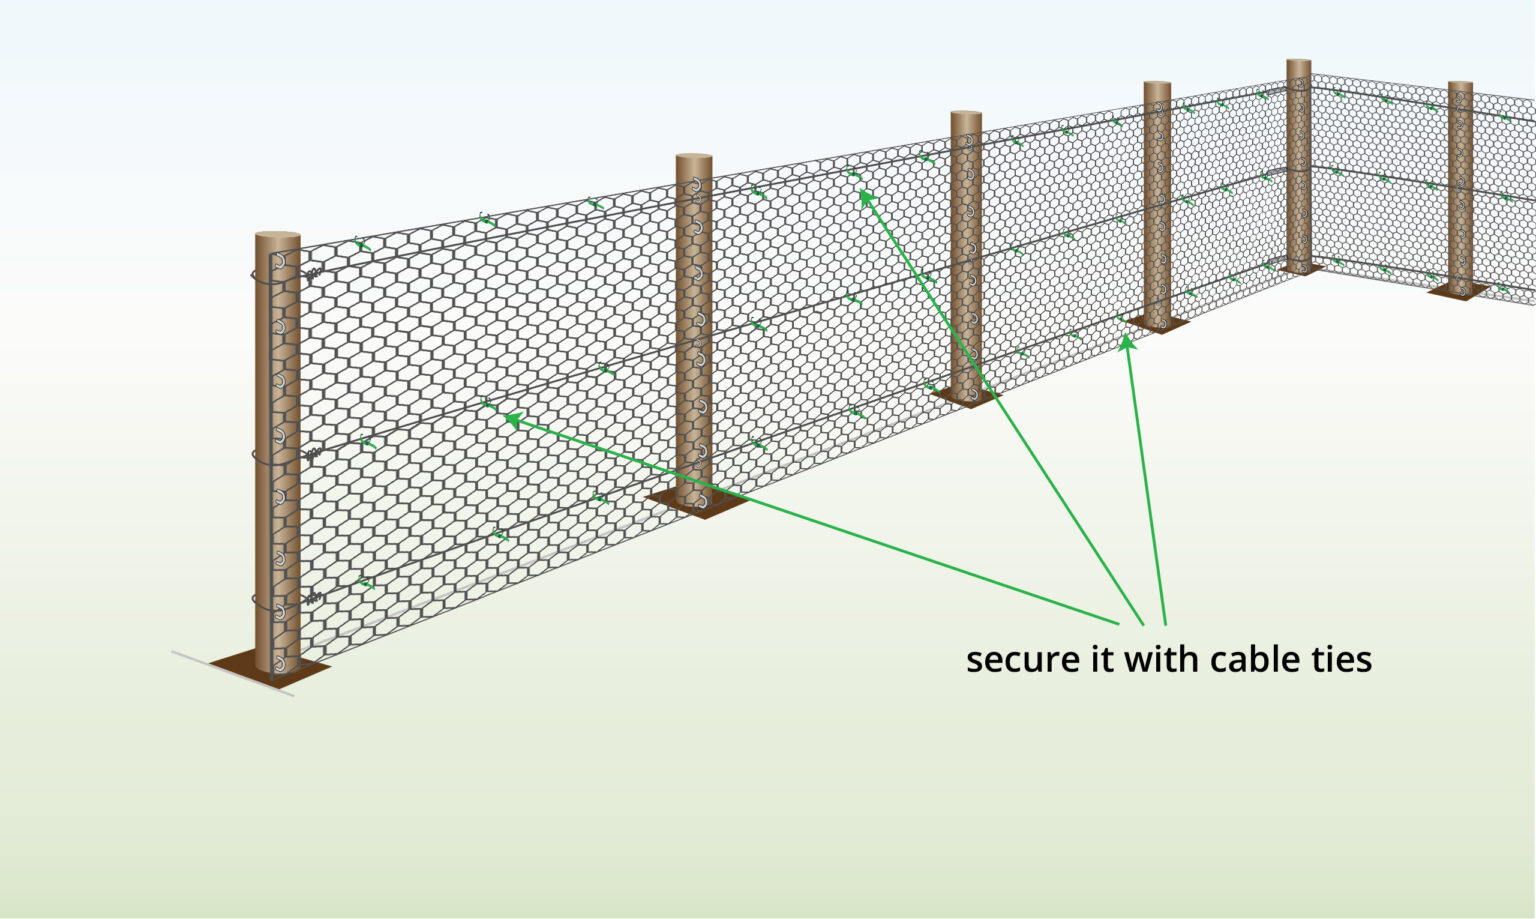
Step 3: Attach the Mesh Fence to Posts
- Unroll the mesh fencing along the fence line.
- Starting at one end, secure the mesh to the first post using fencing staples (for wooden posts) or clips (for metal posts).
- Stretch the mesh tightly toward the next post to avoid sagging.
- Attach the mesh to each post, keeping tension consistent.
- Use wire cutters to trim any excess mesh at the end.
Step 4: Secure the Bottom of the Fence
- To prevent animals from burrowing underneath, bury the bottom edge of the mesh 4-6 inches into the soil or secure it with ground staples.
Step 5: Final Check and Adjustments
- Walk along the fence line to check for loose areas or sagging.
- Tighten any slack and add additional staples or clips as needed.
- Trim any sharp wire ends to avoid injury.
Tips for a Durable and Effective Mesh Garden Fence
- Choose the right mesh size: Smaller mesh openings are better for keeping out small pests.
- Consider post material: Metal posts are more durable but may require specific clips, whereas wooden posts are easier to work with but may rot over time.
- Apply protective coatings: If using wooden posts, treat them with a preservative to extend their lifespan.
- Use tension wire: Adding a tension wire at the top of the fence can increase stability.
- Regular maintenance: Inspect your fence seasonally for damage or loose sections.
Common Challenges and How to Overcome Them
| Challenge | Solution |
|————————–|——————————————-|
| Uneven ground causing sag| Use adjustable post heights or add extra tension wires |
| Posts leaning over time | Ensure deep hole digging and proper concrete setting |
| Mesh rusting | Opt for galvanized or PVC-coated mesh for corrosion resistance |
| Animals digging under fence | Bury mesh deeper or install an underground barrier |
Real-World Example: Protecting a Vegetable Garden
Jane, an avid gardener, installed a 6-foot high mesh fence around her vegetable garden to keep rabbits and deer out. She spaced her posts 7 feet apart and used galvanized mesh for durability. Following the steps above, she installed the fence in a weekend and reported a significant reduction in pest damage the following season.
Conclusion
Installing a mesh garden fence is a straightforward and rewarding project that can dramatically improve your garden’s protection and aesthetics. By planning carefully, using the right materials, and following the step-by-step process, you can create a sturdy fence that lasts for years. Remember to maintain your fence regularly to keep it in top condition.
Ready to safeguard your garden with a mesh fence? Gather your tools, plan your layout, and start your installation today. Your plants and peace of mind will thank you!
Frequently Asked Questions
Q: How deep should fence posts be installed?
A: Usually 12 to 18 inches deep, depending on soil type and fence height.
Q: Can mesh fencing support climbing plants?
A: Yes, mesh fencing is ideal for plants like peas, beans, and cucumbers.
Q: How long does a mesh fence last?
A: With galvanized or PVC-coated mesh and proper maintenance, a fence can last 10+ years.
By following this guide, you can confidently install a mesh garden fence that meets your needs and enhances your outdoor space.
