Preparing your vegetable garden for planting is a crucial step toward achieving a bountiful harvest. Whether you’re a seasoned gardener or a beginner, getting your garden soil and space ready impacts plant health, growth, and yield. This guide walks you through the essential steps to ensure your vegetable garden is primed for success.
In this article, you’ll learn how to prepare your soil, choose the right location, and set up your garden for optimal growth. We’ll cover soil testing, amendment, bed preparation, and tips to protect your garden from pests and diseases. By following this comprehensive approach, you’ll create the ideal environment for your vegetables to thrive all season long.
Why Preparing Your Vegetable Garden is Important
A well-prepared garden bed ensures that your plants receive adequate nutrients, water, and aeration. Proper soil preparation improves root development and reduces the risk of disease, helping your vegetables grow strong and healthy. Neglecting this step often results in poor plant growth or disappointing harvests.
Preparing your garden also allows you to plan your space efficiently, ensuring good sunlight exposure and easy access to water. This upfront effort saves time and frustration later, making your gardening experience more enjoyable and productive.
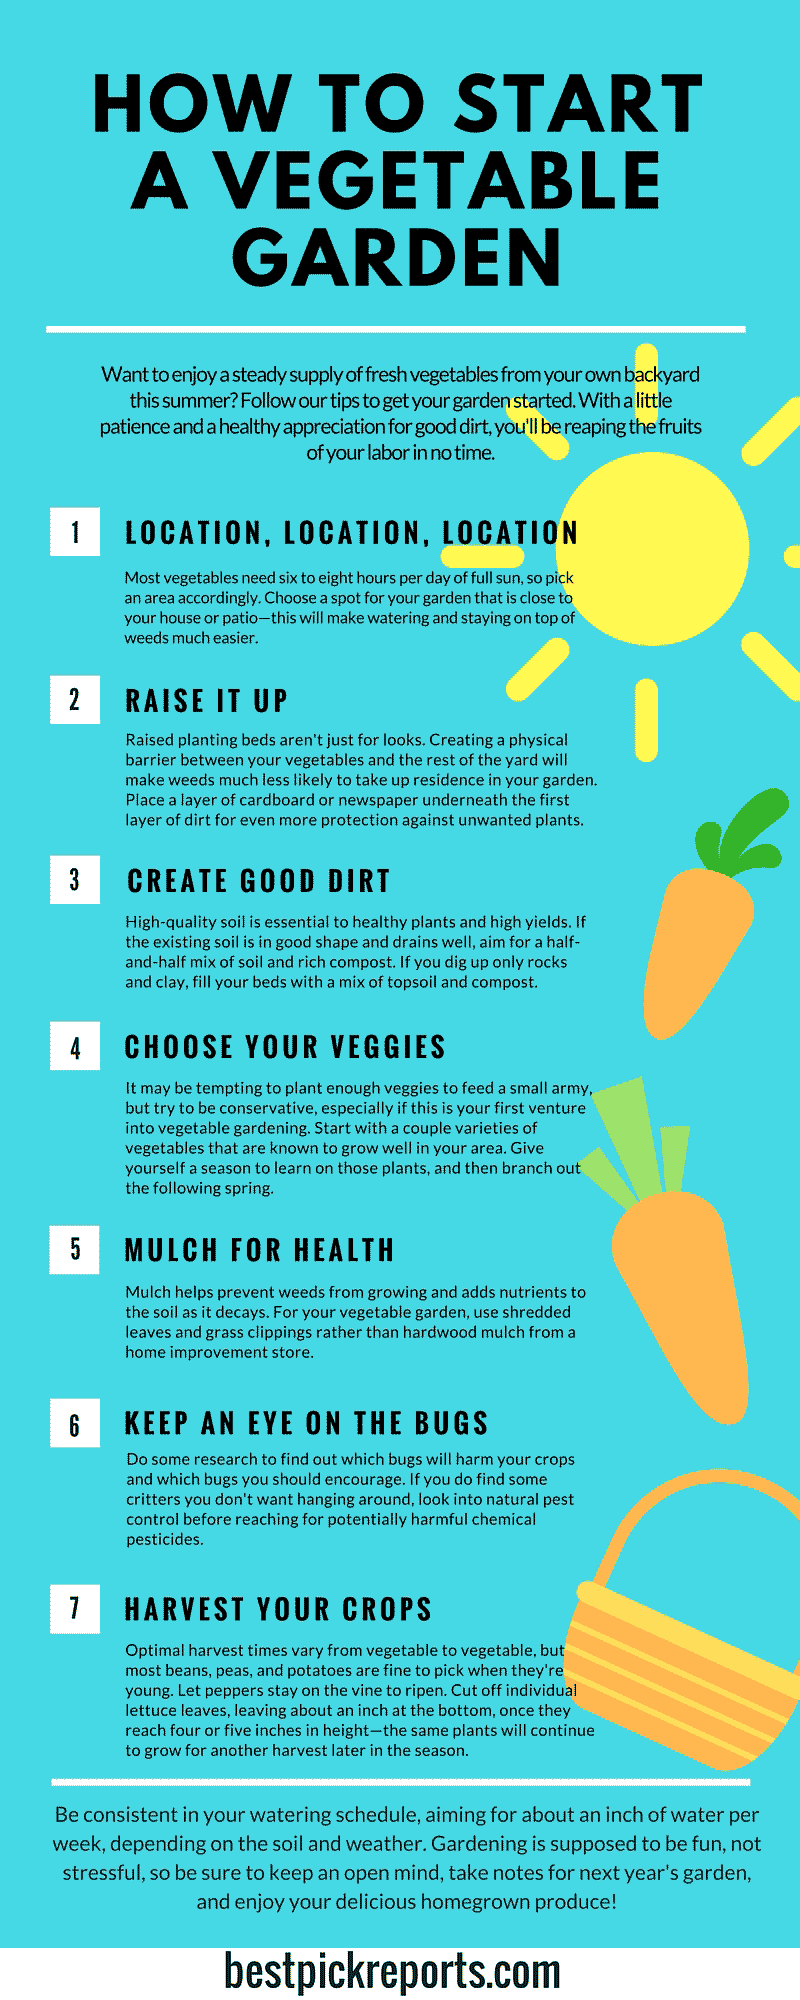
Step 1: Choose the Best Location for Your Vegetable Garden
Selecting the right spot is fundamental for a successful vegetable garden. Consider these factors:
- Sunlight: Most vegetables require at least 6-8 hours of direct sunlight daily. South-facing areas are ideal.
- Soil Drainage: Avoid low spots prone to waterlogging. Well-drained soil prevents root rot.
- Accessibility: Choose a location near a water source and easy to reach for maintenance.
- Protection: If possible, select an area sheltered from strong winds and heavy foot traffic.
Step 2: Clear and Clean the Garden Area
Before planting, clear the site of any debris, weeds, rocks, or old roots. These can compete with your vegetables for nutrients or harbor pests.
- Remove Existing Vegetation: Use a hoe or garden fork to uproot weeds completely.
- Dispose of Debris: Compost or discard plant remains to prevent disease spread.
- Check for Pests: Inspect soil and plants for signs of insects or fungal infections.
Step 3: Test and Improve Your Soil
Healthy soil is the foundation of a thriving vegetable garden. Conduct a soil test to determine pH levels and nutrient content. You can purchase a home test kit or send samples to a local extension service.
- Ideal pH: Most vegetables prefer soil pH between 6.0 and 7.0.
- Nutrient Levels: Check for nitrogen, phosphorus, potassium, and trace minerals.
Based on test results, amend your soil as needed:
- Add Organic Matter: Incorporate compost, aged manure, or leaf mold to improve fertility and structure.
- Adjust pH: Use lime to raise pH or sulfur to lower it, following expert recommendations.
- Fertilize: Apply balanced, slow-release fertilizer tailored for vegetables.
Step 4: Prepare Garden Beds
Well-prepared beds enhance drainage and root penetration. Choose between traditional rows, raised beds, or container gardens depending on your space and preference.
- Loosen the Soil: Use a garden fork or tiller to dig 8-12 inches deep, breaking up compacted soil.
- Shape Beds: Create 3-4 feet wide beds with pathways for easy access.
- Level and Smooth: Rake the surface to remove clumps and create an even planting area.
Step 5: Plan Your Planting Layout
Strategic planning promotes healthy growth and efficient use of space.
- Crop Rotation: Avoid planting the same vegetable family in the same spot yearly to prevent soil depletion and disease buildup.
- Companion Planting: Some plants, like tomatoes and basil, grow better together and can repel pests.
- Spacing: Follow seed packet guidelines to prevent overcrowding and ensure airflow.
Step 6: Watering Setup and Mulching
Proper watering is essential from the start.
- Install Irrigation: Consider drip irrigation or soaker hoses for consistent moisture delivery.
- Apply Mulch: Use straw, wood chips, or shredded leaves to retain moisture, suppress weeds, and regulate soil temperature.
Step 7: Protect Your Garden from Pests and Diseases
Early prevention saves crops later.
- Use Row Covers: Lightweight fabric can shield seedlings from insects and frost.
- Encourage Beneficial Insects: Plant flowers like marigolds to attract pollinators and natural predators.
- Practice Clean Gardening: Remove diseased plants promptly and sanitize tools regularly.
Real-World Example: Successful Garden Preparation
Jane, an experienced home gardener in Oregon, credits her consistent harvests to thorough garden preparation. She tests her soil annually, adds aged compost, and practices crop rotation. Jane also uses raised beds with drip irrigation, which helps conserve water and reduces disease risk. Her vegetable garden thrives, providing fresh produce from spring to fall.
Conclusion
Getting your vegetable garden ready for planting is a vital step that sets the stage for a fruitful growing season. By carefully selecting your garden location, preparing the soil, planning your layout, and implementing protective measures, you create the ideal conditions for your vegetables to flourish.
Start your gardening journey with these proven practices to enjoy healthy plants and abundant harvests. Remember, preparation is key—invest time upfront, and your garden will reward you all season long.
Ready to grow your own vegetables? Begin today by assessing your garden space and testing your soil. With the right preparation, you’ll be well on your way to a thriving vegetable garden!
