Creating a garden pathway is an excellent way to enhance your outdoor space, improve accessibility, and add aesthetic appeal. Whether you have a sprawling backyard or a cozy garden nook, a well-designed pathway can guide visitors, protect your plants, and increase the overall value of your property. This guide will walk you through everything you need to know about how to create a garden pathway, from planning and materials to installation and maintenance.
In this article, we’ll cover the essential steps for designing and building a functional, beautiful garden path. You’ll learn about different pathway materials, layout techniques, and tips for blending your path naturally into the landscape. By the end, you’ll have the knowledge and confidence to create a garden pathway that complements your style and meets your needs.
Why Create a Garden Pathway?
Before diving into the how-to, it’s important to understand why garden pathways matter:
- Improved Accessibility: Paths provide a clear, safe route through your garden, preventing trampling of plants.
- Visual Appeal: A well-crafted pathway adds structure and focal points to your outdoor space.
- Increased Property Value: Attractive landscaping features like pathways boost curb appeal.
- Functionality: Paths connect different parts of your garden, such as patios, sheds, or seating areas.
Now, let’s explore how you can design and build your own garden pathway with actionable steps.
Step 1: Plan Your Garden Pathway
Define the Purpose and Location
Start by answering these key questions:
- What is the primary use? Will your path lead to a door, garden feature, or simply serve as a decorative element?
- Where will it be located? Identify high-traffic areas or desired garden focal points.
- How wide should it be? Most garden paths range from 2 to 4 feet wide for comfortable walking.
Sketch Your Pathway Layout
Use graph paper or a digital tool to draft your path’s shape. Common shapes include:
- Straight paths for formal gardens.
- Curved or meandering paths for a natural, relaxed feel.
Tip: Curved paths create a sense of mystery and invite exploration.
Consider Drainage and Terrain
Ensure your path has proper drainage to avoid puddles or erosion. If your yard slopes, plan for steps or retaining walls.
Step 2: Choose the Right Materials
Selecting the appropriate material is critical for durability, style, and maintenance. Here are popular garden pathway materials:
| Material | Pros | Cons | Ideal For |
|——————-|————————————-|————————————-|—————————-|
| Gravel | Affordable, good drainage, easy to install | Can scatter, needs occasional topping | Rustic or casual gardens |
| Flagstone | Natural look, durable, slip-resistant | More expensive, requires leveling | Formal or naturalistic paths |
| Brick | Classic appearance, durable | Prone to moss/slippery when wet | Traditional or cottage gardens |
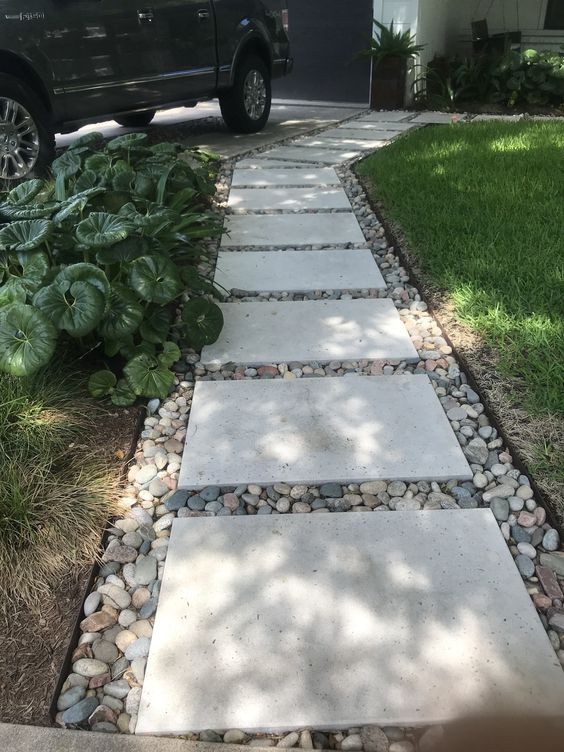
| Concrete Pavers| Versatile shapes/colors, low maintenance | Can crack, less natural appearance | Modern or high-traffic paths |
| Wood Mulch | Inexpensive, blends with nature | Decomposes over time, needs replacement | Informal or woodland paths |
Step 3: Prepare the Ground
Mark and Clear the Path
- Use spray paint or garden hoses to outline the path shape.
- Remove grass, weeds, and debris within this area.
- Dig down 4 to 6 inches to create a level base.
Install Edging (Optional but Recommended)
Edging materials like metal, plastic, or stone help keep your path materials contained and tidy.
Step 4: Lay the Base
A proper base ensures your pathway remains stable and prevents sinking.
- Add a layer of crushed stone or gravel (about 3 inches thick).
- Compact the base using a tamper or plate compactor.
- For flagstone or pavers, add a 1-inch layer of sand on top to level the stones.
Step 5: Install the Pathway Material
For Gravel:
- Spread gravel evenly over the base.
- Rake smooth and add more gravel if needed to reach the desired depth.
For Flagstone or Pavers:
- Lay stones/pavers according to your design.
- Use a rubber mallet to set them firmly.
- Fill gaps with sand, gravel, or ground cover plants.
Step 6: Finishing Touches
- Add lighting along your path for safety and ambiance.
- Plant low-growing flowers or ground covers along the edges.
- Regularly weed and maintain the pathway to keep it attractive.
Expert Tips for a Lasting Garden Pathway
- Consider accessibility: Paths should be wide enough for wheelbarrows or mobility aids if needed.
- Use permeable materials like gravel or gaps between pavers to reduce runoff.
- Blend with your garden style: Match materials and shapes to your existing landscaping.
- Hire professionals for complex designs or large projects to ensure quality.
Conclusion
Creating a garden pathway is a rewarding project that adds beauty, function, and value to your outdoor space. By carefully planning your path, selecting suitable materials, and following proper installation steps, you can build a pathway that complements your garden’s style and meets your practical needs.
Start by envisioning the path’s purpose and layout, then choose materials that fit your budget and aesthetic. Remember to prepare a solid base and finish with thoughtful touches like lighting and edging. With this guide, you’re well-equipped to transform your garden with a charming, durable pathway.
Ready to get started? Grab your tools and begin designing your perfect garden pathway today!
